If you’re looking for some fun Raspberry Pi projects for kids, you’ve come to the right place! In this article, we will discuss 10 awesome projects that will keep your kids entertained for hours on end. We’ll answer common questions about Raspberry Pi projects for kids, such as what they are and how to get started. We’ll also provide helpful tips and advice on making the most of these projects. So without further ado, let’s get started!
Is Raspberry Pi a Good Single-Board Computer For Kids?
The Raspberry Pi has been used for projects ranging from home automation systems to robotics, and it can turn almost any project into reality due to its small size and vast capabilities.
One of the main advantages of the Raspberry Pi is its affordability. This makes it much more affordable than traditional desktop computers or laptops, which often cost hundreds or even thousands of dollars more. Additionally, when you buy a Raspberry Pi you also get all the necessary accessories in the box, making it an all-in-one solution for a project. This makes it much easier to start right away without needing to purchase additional components or software.
In addition to its affordability and portability advantages, the Raspberry Pi offers some great features for programming tasks as well. It has powerful features such as multiple USB ports, Ethernet connections, HDMI video outputs, and an array of GPIO pins. It also runs a variety of operating systems such as Debian Linux, Raspbian, Windows 10 IoT Core, and more. This makes it well suited for almost any type of project requiring a computer.
The Raspberry Pi is a great choice for kids because it is inexpensive, easy to use and program, and contains tons of resources that teach kids the fundamentals of coding. It also encourages them to explore new concepts such as electronics, robotics, artificial intelligence, and more.
The Raspberry Pi comes with an easy-to-use graphical user interface (GUI) which makes it easy for kids to get started with programming quickly. Since the operating system supports popular programming languages, it means that they can learn coding skills that will have real-world applicability when they become adults.
In addition, the Raspberry Pi has a wide range of educational materials available online including tutorials, books, and videos. These resources can be used to learn the basics of coding and even build projects from scratch. This makes it an ideal choice for kids who are just starting out with programming or want to pursue a career in computer science when they grow up.
The Raspberry Pi also supports many different add-ons such as sensors, motors and other components which can be used to teach kids about electronics and robotics. With these add-ons, kids can create their own projects such as robots or automated systems which further enhances the educational value of the board. [1]
What Languages Can Kids Use to Code Raspberry Pi?
Now that you know why the Raspberry Pi is a great choice for kids, let’s take a look at some of the programming languages that can be used to code it.
Python
It’s a great choice for kids because it was designed to be easy to read and understand, so even someone brand new to coding can quickly learn how to use Python. Plus, there are plenty of libraries that allow kids to create sophisticated programs with minimal effort.
Scratch
Scratch is another great option for beginning coders who want to work on Raspberry Pi projects. This visual programming language was developed by MIT and is specifically designed for beginners. It allows users to drag-and-drop blocks of code instead of having to type out lines manually, making it easier to understand. Scratch is also incredibly versatile and can be used for everything from game development to robotics.
Raspberry Pi Projects For Kids
So now that you know about the two main languages used for coding with Raspberry Pi, let’s take a look at some of the projects kids can make with their device. From simple games and electronics projects to more advanced home automation systems and robots, there are lots of fun things kids can do with this powerful tool.
3D LED Science Display with Scratch
The next project we shall cover is a 3D LED Science Display with Scratch. This project is an extension of the previous one, and it can be used to teach students about coding and physics. To make your own 3D LED Science Display with Scratch, you will need:
- A Raspberry Pi board
- Scratch
- LEDs (light emitting diodes) in various shapes or colors depending on your preference – this can be bought from any electronics store
- An appropriate length of wire for connecting the LEDs to the Raspberry Pi board
- Solderless pluggable connectors for connecting the LEDs to the wire
First, start by setting up the hardware components and connect them according to the model you have in mind. The Raspberry Pi board should be connected to the LEDs via the solderless pluggable connectors and the wire. We suggest daisy-chaining some especially long wires if you want to create a bigger display.
To ensure there won’t be any short circuits, you can wrap a little bit of tape on each of the LED’s legs. This will also prevent the legs from touching each other or making contact with other components. Make sure you remember the numbers of all the LEDs, as this will help you later when coding.
Once the hardware is set up, open Scratch on the Raspberry Pi and create a new project. First we will set-up the LED blinking in a regular pattern. In the forever block, select the LED pin and set ‘1 second’ in the wait block. Then you need to set the digital output in ‘1’ (on) and wait for 1 second before setting it back to ‘0’ (off).
To create random blinking, you simply need to add a ‘pick random block’ in the ‘wait’ block, which will generate a random number you set. This will make the LEDs blink randomly instead of evenly.
To control the LED by clicking on the sprite, select ‘when this sprite clicked’ and set ‘1-2 seconds’ in the wait block. Then, select the digital output of the pin and set it to on or off. The LED will blink when you click on it.
You can also control your LED by clicking on the set key, instead of the sprite. To do this, select ‘when a key is pressed’ and set it to the key you want to use.
Sensing menu is yet another way to control the LED. In this block, you can select ‘touching’ to detect whether the sprite is touching the LED or not. If it touches, you can set the digital output to on and if it doesn’t touch, you can set it to off.
To improve your project, you can add some sounds or even images to it. Select ‘when this sprite clicked’ and add a sound to it by clicking ‘start sound’. You can simulate how the project works on screen with the ‘stage’ menu. You can select a sprite and set its direction and speed in the ‘motion’ block.
Now it’s time to test it all out! When you’re happy with your project, upload it to the Raspberry Pi board and see how it works.
A Raspberry Pi interactive book
If you ever dreamed of making an interactive book with your Raspberry Pi, then now is the time to do so! With the right software and hardware, you can create unique stories that allow readers to engage with the content in ways they never have before.
To get started on this project, you’ll need :
- A Raspberry Pi computer
- Socket-to-socket jumper wires
- Thin cardboard (manila folders or cereal boxes are perfect!)
- Aluminium foil
- Glue
- Strong tape
- Scissors or a craft knife (get an adult’s permission to use sharp tools!)
First of all, you should decide on what your book will be about and for what audience it is intended. Once you’ve sorted that out, draw a template for your book on the cardboard and cut it out into two pieces for the front and back covers. Now you can use the glue or tape to attach aluminum foil to each of these covers; this will make them conductive so they can be used as switches when connected to your Raspberry Pi.
Then you need to connect the jumpers to both sides of each cover using one wire per side (the other end of the wires should be connected to specific pins on your Raspberry Pi). You should also create an image file with images related to your story – one image per page in the book.
To create a well-rounded page, you’ll need to combine two pieces of cardboard (or any other non-conductive material) on each side and connect them with aluminum foil contacts in the interior. Cut out enough cardboard and foil for each of your planned pages (don’t forget to include the cover!). If you choose to craft your book out of cardboard, ensure that you cut two individual pieces – one for the front cover and another for the back.
On each page, construct a basic design that reflects the proceedings in your book. When finished, cut out these illustrations and substitute them with foil to form tactile buttons connected to Raspberry Pi’s general purpose (GP) pins. Your reader can then interact with these interactive elements for a more immersive experience!
Flex all of your artistic capabilities to craft the designs on each page of your book, then carefully cut them out with a scalpel or scissors. With this simple process, you’ll have successfully crafted the necessary images for both sides of every page!
Grip the socket-socket jumper wire tightly and pull one of the ends off to reveal the core inside. Turn your cut-out image over so you are looking at the back (or the inside of your manila folder). Apply a lot of glue to the outside of the cut-out photo. Then, press one end of the wire onto the glue. Make sure that the F side is pointing towards where you want to put the spine of your book.
Place the foil over the cut-out. Make sure it is pressed down firmly so it will stay in place. Then, take the tape and attach it to the end of the wire that is not attached to anything. Do this close to the base of the wire so it will not come off by accident.
Put glue on the back of the cardboard. Put the other piece of cardboard on top of it. Put the foil and wire in between. Repeat the same process for each page and bind everything together.
It’s time to construct your communication tool. This gadget will permit readers to press the buttons because it serves as a medium of connection that could bridge the gap between each cut-out image. Create your desired shape for your interaction tool with cardboard or reuse any suitable item that can do the job.
For optimal engagement, start by pulling the two ends of a socket-socket wire off and firmly affixing one to the base of your interaction tool with tape or glue. Then, wrap it up in foil for extra stability and secure its foundation using additional adhesive material. This will ensure that when users grab hold, they get an uninterrupted experience tailored just for them!
You can use your Raspberry Pi’s GPIO pins to connect your pages and interaction tool. Just make sure you remember which pin is connected to what.
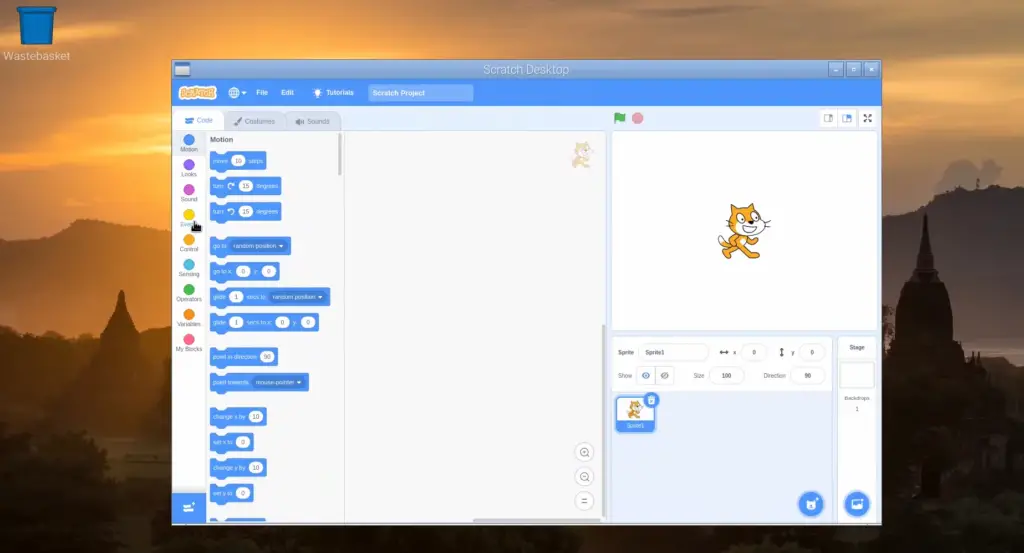
Now it’s time to code! This is where you can really flex your programming muscles and make your Raspberry Pi Projects for Kids Epic Guide come to life. Use Scratch, a simple block-based coding platform, to construct the necessary scripts that will power your interactive book!
Start small and be sure to test your project every time you add something new. You can even ask your friends and family to help you out with the coding if need be!
To begin, launch a new project on your Raspberry Pi in Scratch and integrate the Simple Electronics extension into it. Then, let your creativity flow!
For one, you definitely want to add backdrops to your project that correspond to the designs and illustrations you have put into your book. To bring life to your characters, you can add costumes and animations too!
Perfect your project with beautiful, eye-catching graphic effects! Just use the set color effect to and change color effect by blocks from a wide variety of options that will help you alter the look of any sprite. Incorporate these helpful tools into your projects for maximum creativity and flair.
Once the visuals are taken care of, it’s time to add the code that will make your buttons interactive. To do this, you’ll need to use a special extension script in Scratch called “when button is pressed.” This script will tell your Raspberry Pi what to do when a particular button is pressed inside your book – whether it be advancing to the next page or playing a sound.
You can even record sounds of your own making to give your project a more personal touch!
Finally, set up the conditions that will make your Raspberry Pi interact with the reader. This can be anything from changing background graphics when buttons are pressed or playing sound effects. Take as much time as you need to get these details right and make sure your interactive book looks and works exactly how you want it. Don’t forget to save your project every time you make changes!
You can refer to Scratch documentations and guides online if you want to explore all the possibilities your project has to offer.
Once done, you should have an interactive book! Now when you flip the pages, it will show you the illustrations paired with codes that animate them. And when a reader presses any button, they will be rewarded with graphics and sounds of your own making. [2], [3]
FAQ
What languages can you use to code on Raspberry Pi?
When it comes to coding on Raspberry Pi, the possibilities are almost endless. The most popular language for Raspberry Pi is Python, a versatile and easy-to-learn programming language that kids can use for projects ranging from simple web pages to complex games.
In addition to Python, you can also program in other languages with Raspberry Pi such as C/C++ and Java. If you’re looking for something more challenging, then why not learn Assembly Language? With Assembly Language you can write code directly into the CPU of your Raspberry Pi to get closer access to its hardware components and create highly optimized programs.
Can kids use Raspberry Pi?
Yes, absolutely! Raspberry Pi is a great tool for kids to learn the basics of computers and coding. It’s small, affordable, and easy to use, making it an ideal choice for children who are just getting into technology.
Raspberry Pi can be used in a variety of projects ranging from simple experiments to more complex ones such as building a robot or creating music. It’s also compatible with dozens of different tools and programming languages which makes it incredibly versatile.
Because of its low price point, Raspberry Pi also allows parents to introduce their children to technology without breaking the bank. This way parents can ensure that their kids have access to quality educational materials without having to worry about cost.
What can a kid do with Raspberry Pi?
A kid can do a lot of great things with Raspberry Pi. With the help of a few add-ons, it is possible to create fun projects that involve coding, robotics, and more.
One popular project for kids is to program an LED light display. This involves connecting the Pi to an LED strip and then writing code in Python or Scratch (a visual programming language). The result is a display that can be programmed to show various patterns and designs.
There are even starter kits available that come with all the necessary parts to build a basic robot.
What age can kids start with Raspberry Pi?
It depends on the individual child and their level of understanding. Generally speaking, children as young as 8 can start tinkering with Raspberry Pi projects, while younger children may be able to get started at an early age if accompanied by a knowledgeable adult.
When getting started with Raspberry Pi projects for kids, it is important to consider the age and capabilities of the child in order to ensure they have access to appropriate resources. For example, younger children may need more guidance when completing tasks or require tools which are designed specifically for their needs. Similarly, older children will likely benefit from more advanced tutorials or programming languages tailored towards their particular skill set.
Useful Video: 15 Raspberry Pi Projects for Beginners
Conclusion
Raspberry Pi projects for kids can be a great way to help teach children important coding, engineering and problem-solving skills. In addition to being educational, these projects are also fun and engaging activities that the whole family can enjoy. With so many different options available, it’s easy to find a project that fits any child’s interests and skill level. With the help of Raspberry Pi projects for kids, young people can learn invaluable lessons while having a blast in the process!
We hope this guide has given you an overview of some of the awesome possibilities with Raspberry Pi projects for kids. From creating interactive games to building robots and more, the possibilities are endless when it comes to teaching children how to code with Raspberry Pis. We wish you luck on your Raspberry Pi project journey and hope you have an awesome time!
For more interesting Raspberry Pi projects, check out our other articles. We’ve got plenty of ideas for kids to explore whether they are just beginning or have been working with Raspberry Pis for a while. Happy coding!
References
- https://www.raspberrypi.org/help/what-%20is-a-raspberry-pi/
- https://projects.raspberrypi.org/en/projects/scratch-3d-science/1
- https://projects.raspberrypi.org/en/projects/scratchpc-interactive-book/1




Leave a Reply