
The Raspberry Pi, a small and affordable single-board computer, has gained significant popularity in recent years. Its versatility allows it to run various operating systems, handle diverse tasks, and serve as an educational tool for learning coding. One of the many intriguing projects you can undertake with a Raspberry Pi is transforming it into a fully functional security camera using MotionEyeOS. This opens up a world of possibilities for surveillance and monitoring, whether it’s for home security or DIY projects. With its compact size and powerful capabilities, the Raspberry Pi offers an accessible and exciting platform for exploring the realms of technology and innovation.
What is MotionEyeOS?
The user-friendly web-based interface provided by MotionEyeOS makes it effortless to configure, manage, and monitor live feeds from your cameras. Its advanced motion detection capabilities ensure that you stay informed by receiving alerts whenever any movement is detected. Not only that, MotionEyeOS allows you to conveniently store recordings in various formats, providing you with a comprehensive and reliable security solution.
Whether you are looking to secure your home, monitor your office, or enhance the safety of any other space, MotionEyeOS offers the perfect blend of simplicity, functionality, and affordability. Experience peace of mind with MotionEyeOS – the ultimate video surveillance software for your Raspberry Pi. [1]
MotionEyeOS Features
- Extensive Camera Support: MotionEyeOS is designed to provide extensive support for a wide range of network cameras, ensuring compatibility with popular brands such as Axis, Foscam, and D-Link. Additionally, it offers seamless integration with USB webcams, allowing for even greater versatility and adaptability to suit your specific camera requirements.
- User-Friendly Interface: With its intuitive and user-friendly web-based interface, MotionEyeOS empowers you to effortlessly configure and manage your cameras. The interface not only simplifies the setup process but also provides a unified platform for monitoring multiple cameras, offering live feeds and recordings in a cohesive and easily accessible manner.
- Advanced Motion Detection: MotionEyeOS goes beyond basic motion detection by offering advanced capabilities that provide enhanced security and peace of mind. You can receive real-time alerts and notifications whenever any movement is detected, enabling you to stay informed and take prompt action. Furthermore, you have the flexibility to customize the sensitivity and define specific areas of detection for each camera, ensuring precise and tailored monitoring.
- Flexible Storage Options: MotionEyeOS understands that storage requirements vary, which is why it offers a range of storage options to cater to diverse needs. Whether you prefer local storage on your Raspberry Pi for quick and convenient access, network-attached storage (NAS) for centralized storage and management, or cloud-based services like Dropbox for seamless remote access, MotionEyeOS provides you with the freedom to choose the storage solution that best aligns with your preferences and requirements.
- Customization and Automation: With MotionEyeOS, you are in complete control of your camera settings and automation. You can effortlessly customize various parameters such as resolution, frame rate, and recording length for each camera, allowing you to optimize the performance and quality of your video feeds. Moreover, MotionEyeOS enables you to automate actions based on specific events or schedules, such as starting and stopping recordings, ensuring that your cameras are actively monitoring and capturing crucial moments when needed. [1]
Parts Required
To successfully install MotionEyeOS on your Raspberry Pi, make sure you have the following components ready:
- Raspberry Pi board: It is recommended to use Model 2 or a newer version for optimal performance and compatibility.
- SD card: Ensure that you have an SD card with a minimum capacity of 8GB. This will provide enough space to accommodate the operating system and other necessary files.
- Power supply: Don’t forget to have a suitable power supply for your Raspberry Pi. This will ensure a stable and reliable power source for uninterrupted operation.
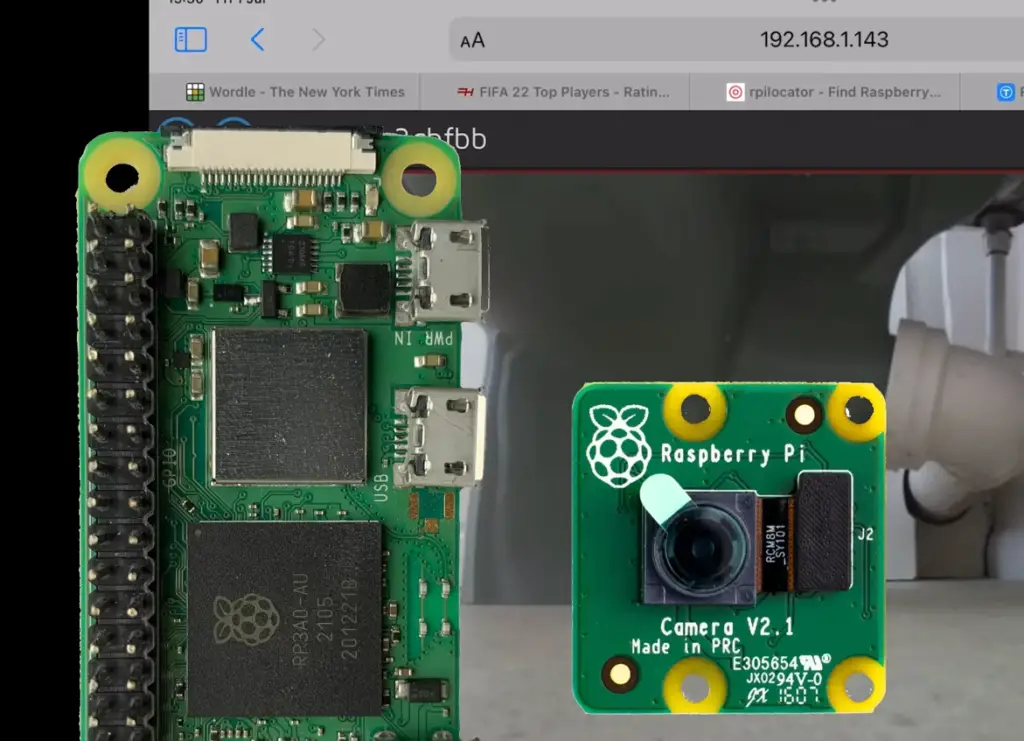
- Camera: You will need a compatible camera for MotionEyeOS. You can choose either a USB webcam or a network camera based on your preference and requirements
.
By gathering these essential components, you will be well-prepared to install MotionEyeOS and explore its capabilities on your Raspberry Pi. Enjoy the journey of creating your own surveillance system! [1]
Installing MotionEyeOS
Formatting your microSD card
- Here is a detailed step-by-step guide to get started with MotionEyeOS:
- Begin by formatting your SD card using a reliable tool like SDFormatter. This will ensure that the card is clean and ready to receive the necessary files for MotionEyeOS.
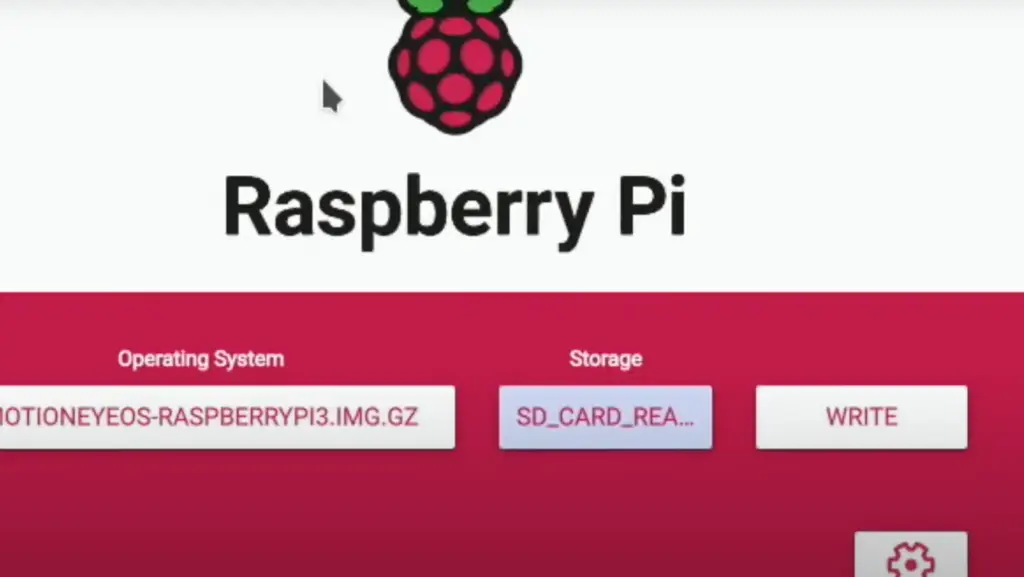
- Next, visit the official MotionEyeOS website (https://github.com/ccrisan/motioneyeos/releases) and download the latest version of MotionEyeOS. It’s important to have the most up-to-date version for optimal performance and compatibility.
- Once the download is complete, extract the downloaded zip file. Inside, you will find the .img file. This file contains the complete image of the MotionEyeOS operating system that needs to be copied onto your SD card.
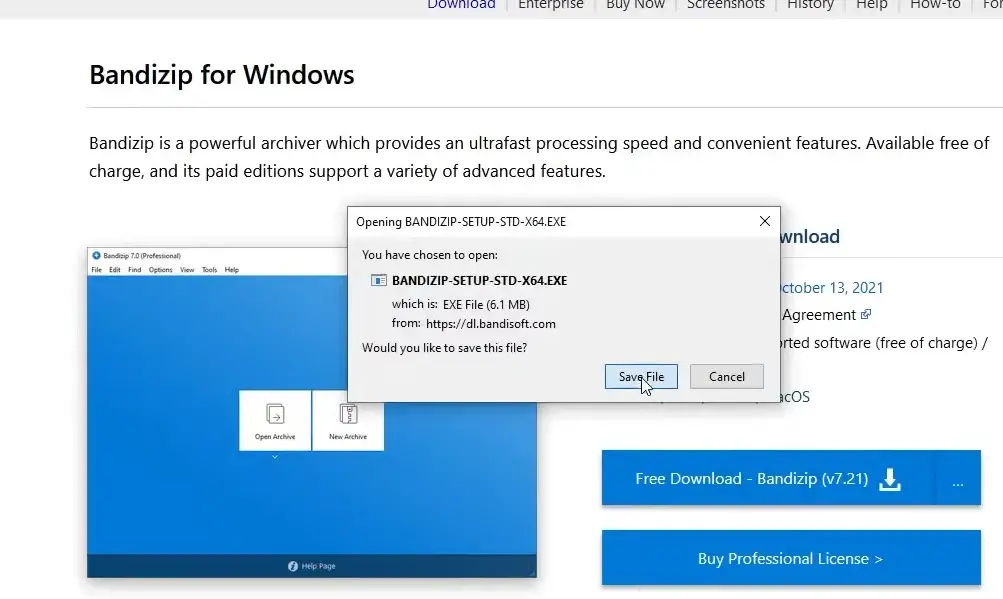
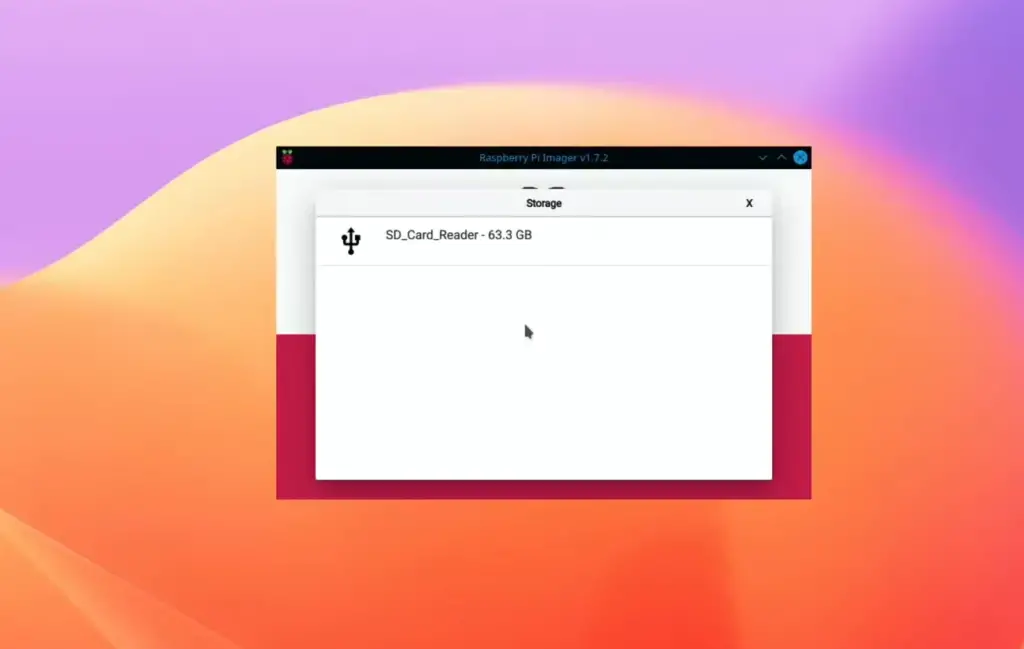
- To write the .img file onto your SD card, use a reliable tool like Win32DiskImager or Etcher. Open the tool and select the correct drive letter corresponding to your SD card. Double-check this selection before proceeding to avoid overwriting any important data. Confirm the selection and let the tool write the image onto the SD card.
By following these steps, you will successfully set up MotionEyeOS on your SD card, ready to be used for your desired application. Enjoy exploring the features and capabilities of MotionEyeOS! [1]
Downloading the OS Image
- After formatting your SD card, you will need to download the MotionEyeOS image file. To find the latest versions, visit their official website at (https://github.com/ccrisan/motioneyeos/releases). Look for the version that is compatible with your specific Raspberry Pi model and click on the corresponding .img.gz file to initiate the download.
- Once the download is complete, you can proceed to extract the contents of the .img.gz file. This process will unpack the compressed files and give you the .img file, which contains the complete MotionEyeOS operating system.
- The next step is to write the MotionEyeOS operating system onto your SD card. You can do this by using software like Etcher or Win32 Disk Imager. Simply select the .img file and choose your SD card as the destination to complete the writing process. [1]
By following these detailed steps, you will have the MotionEyeOS operating system installed on your SD card, ready to be used for your Raspberry Pi project.
Writing the Image to the SD Card
- In order to write the MotionEyeOS image onto your SD card, you will need to use a reliable tool such as Etcher or Win32 Disk Imager. These tools are specifically designed to ensure a smooth and error-free process.
- Start by inserting your SD card into your computer and opening the chosen tool. This will allow you to access the necessary features and options for the image writing process.
- Once the tool is open, you will need to select the MotionEyeOS .img file as the source. This file contains all the necessary components and configurations for MotionEyeOS to run smoothly. Additionally, choose your SD card as the destination where the image will be written.
- Before proceeding with the image writing process, it is crucial to double-check the selected drive letter. This will help you avoid any accidental overwriting of important data stored on other drives. Taking this precautionary step ensures the safety of your valuable information.
- Once you have confirmed the correct drive letter and selected the image and destination, you can proceed with the image writing process. Simply click on the appropriate button or option in the tool to initiate the writing process. The tool will handle the rest, ensuring that the image is written onto your SD card accurately and efficiently.
- After the writing process is completed, you can safely remove your SD card from your computer. Insert the SD card into your Raspberry Pi, and you are ready to start using MotionEyeOS. Enjoy the enhanced features and functionalities that MotionEyeOS brings to your Raspberry Pi-powered projects. [1]
Booting MotionEye on Raspberry Pi
- Once you have successfully written the MotionEyeOS image onto your SD card, you are now ready to boot your Raspberry Pi into MotionEyeOS. This powerful operating system will provide you with a range of surveillance capabilities and exciting project possibilities.
- Make sure to carefully insert the SD card into your Raspberry Pi and connect it to a power source using a suitable power supply. This will ensure a stable and reliable operation for your device.
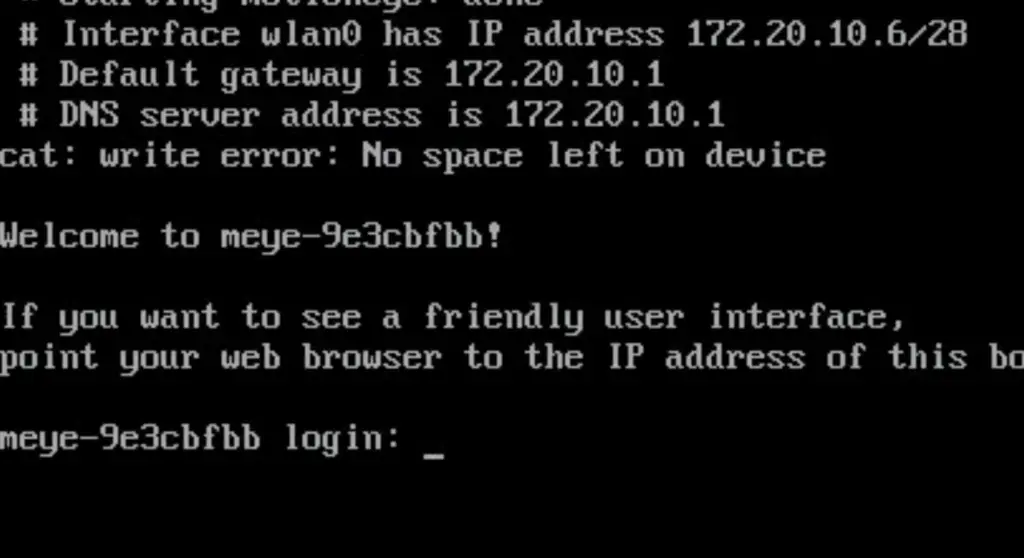
- After powering on, give the operating system some time to boot up and initialize all the necessary components. This process may take a few moments, but it is crucial for ensuring a smooth and seamless experience.
- Once the booting process is complete, you will be prompted to enter your login credentials. The default username is “admin,” and the password field is left blank for your convenience. This initial setup step ensures the security of your MotionEyeOS installation.
- Now that you have successfully logged in, it’s time to start configuring MotionEyeOS according to your preferences and requirements. This includes setting up cameras, customizing settings, and exploring the wide range of additional features available. Take your time to explore the various options and unleash the full potential of MotionEyeOS.
By following these detailed steps, you have now successfully installed and booted MotionEyeOS on your Raspberry Pi. With this powerful operating system at your disposal, you can create your own comprehensive surveillance system or dive into other exciting projects that leverage its capabilities. Get ready to explore a world of possibilities with MotionEyeOS on your Raspberry Pi! [1]
Finding Your Raspberry Pi IP Address
- Before you can fully utilize the impressive capabilities of MotionEyeOS, it is crucial to locate your Raspberry Pi’s IP address. This will grant you seamless access and control over your device remotely from any computer or mobile device, ensuring a convenient and flexible experience.
- One effective approach to finding your Raspberry Pi’s IP address is by leveraging a network scanning tool such as “Angry IP Scanner” or “Advanced IP Scanner.” These efficient tools diligently scan your local network, meticulously displaying all connected devices, including your Raspberry Pi, along with their corresponding IP addresses. This comprehensive overview allows for effortless identification and access.
- Alternatively, another viable option to discover your Raspberry Pi’s IP address is by accessing your router’s configuration page. Within this interface, you can effortlessly explore the list of connected devices, including your Raspberry Pi, and unveil the corresponding IP addresses. This straightforward method provides an additional avenue to pinpoint the IP address with great ease.
- Armed with the invaluable knowledge of your Raspberry Pi’s IP address, you can now take full advantage of MotionEyeOS’s web interface from any computer or mobile device connected to the same network. This seamless accessibility empowers you to remotely monitor and exercise complete control over your surveillance system or project, utilizing the powerful features of MotionEyeOS. [1]
By conscientiously following these meticulous steps, you have successfully located your Raspberry Pi’s IP address, unlocking the boundless potential and possibilities offered by MotionEyeOS.
Accessing MotionEye For the First Time
- Once you have successfully located your Raspberry Pi’s IP address and can comfortably access the device remotely, it is time to embark on an exciting journey with MotionEyeOS. As a user-friendly operating system, MotionEyeOS warmly welcomes you with its intuitive web interface, meticulously designed to elevate your overall experience to new heights.
- Upon gracefully entering the IP address in your preferred web browser, you will be greeted with the MotionEyeOS login page, adorned with a touch of elegance. Simply enter the credentials you have previously set, and like a magic key, the doors of the web interface will swing open, revealing a world of endless possibilities.
- As you take your first steps into the realm of MotionEyeOS, it is highly recommended to indulge in a moment of exploration, allowing yourself to wander through the vivid menus and abundant options that lay before you. This initial voyage of discovery will grant you a profound understanding of the immense capabilities and unparalleled customizability of this remarkable operating system. So, seize this opportunity to immerse yourself in its depths and unlock the true potential of MotionEyeOS. [1]
Initial Setup and Configuration
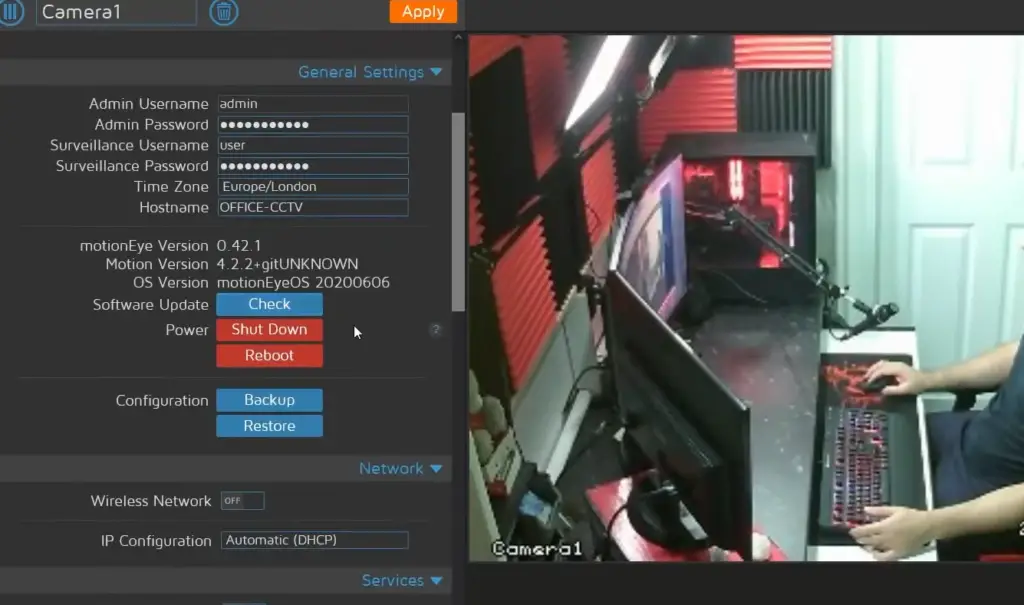
- With the MotionEyeOS web interface at your fingertips, it’s time to dive straight into the setup process to tailor your installation according to your unique preferences and requirements.
- One of the first steps in configuring MotionEyeOS is setting up cameras, a crucial aspect of this operating system. By clicking on the “Add Camera” button on the web interface, you can effortlessly add a camera and begin customizing its settings. MotionEyeOS supports a wide range of cameras, including USB webcams, Raspberry Pi cameras, and IP/network cameras.
- Along with configuring cameras, the web interface also offers an array of other customization options for your installation. These include setting up motion detection zones, adjusting image quality and resolution, and exploring various advanced features such as custom commands, notifications, and scheduling.
- As you continue to delve further into the customization process, you will discover a plethora of additional options that allow you to tailor MotionEyeOS to perfectly fit your unique needs. With its user-friendly interface and extensive range of features, MotionEyeOS provides a seamless and comprehensive experience for any project or use case. [1]
By thoughtfully configuring your MotionEyeOS installation, you have now unlocked the full potential of this remarkable operating system.
FAQ
How do I set up motionEye?
To set up motionEye, you will need to first install MotionEyeOS on your Raspberry Pi. This can be easily accomplished by following the step-by-step instructions provided in the comprehensive guide. Once you have successfully installed MotionEyeOS, you can access the powerful features of motionEye through its intuitive web interface. From there, you can effortlessly configure cameras, fine-tune settings, and even customize various aspects to suit your specific needs. With motionEye, you’ll have complete control over your surveillance system, ensuring optimal performance and peace of mind.
Is MotionEyeOS still supported?
Yes, MotionEyeOS is indeed still actively maintained and supported by its dedicated developers. With their commitment to the project, it continues to receive regular updates and bug fixes, ensuring a stable and reliable experience for its users. The developers work diligently to enhance its functionality, optimize performance, and address any issues that may arise, making MotionEyeOS a top choice for those seeking a robust and dependable solution for their surveillance needs.
Which OS can Raspberry Pi run?
The Raspberry Pi, a versatile single-board computer, supports a wide array of operating systems. Some popular options include MotionEyeOS, Raspbian, Ubuntu Mate, and many others. It’s worth noting that not all operating systems are specifically optimized for the Raspberry Pi’s hardware capabilities. Hence, it is crucial to carefully select the most suitable operating system for your specific project or use case, ensuring optimal performance and compatibility. Taking this thoughtful approach will ensure a seamless and successful experience with your Raspberry Pi endeavors.
How do I use a motion sensor with my Raspberry Pi?
To successfully utilize a motion sensor with your Raspberry Pi, you will need to establish a connection between the sensor and the GPIO pins on the board. Once the connection is established, you can configure MotionEyeOS to initiate recording or generate notifications whenever motion is detected by the sensor. For a comprehensive understanding of the setup process, including step-by-step instructions, please refer to the tutorial section provided in this guide.
Can a Raspberry Pi detect motion?
Yes, a Raspberry Pi can indeed detect motion by utilizing external sensors or cameras. This capability is made possible through MotionEyeOS, a feature-rich platform that offers comprehensive motion detection functionalities. With its advanced capabilities, MotionEyeOS is an excellent choice for various applications, including surveillance systems and other projects that require reliable and accurate motion sensing capabilities. Whether it’s for home security or innovative DIY projects, MotionEyeOS on a Raspberry Pi provides the flexibility and performance needed to achieve your desired outcomes.
How do I add sensors to my Raspberry Pi?
To add sensors to your Raspberry Pi, you will need to connect them to the GPIO (General Purpose Input/Output) pins on the board. These pins serve as the interface between the Raspberry Pi and external devices, allowing for data exchange and control. By configuring MotionEyeOS, an open-source software, you can set up your Raspberry Pi to receive input from these sensors and trigger actions based on the received data. For a comprehensive step-by-step guide on how to connect and configure sensors with MotionEyeOS, please refer to the tutorial section in this guide. It provides detailed instructions and helpful tips to ensure a successful integration of sensors into your Raspberry Pi setup.
Does Raspberry Pi have motion detection?
The Raspberry Pi itself does not have built-in motion detection capabilities. However, with the help of external sensors or cameras and a suitable operating system like MotionEyeOS, it can be used for motion detection in various projects and applications. So, you can easily enhance your project’s functionality using MotionEyeOS and take advantage of its extensive features.
Useful Video: CREATE YOUR OWN PRIVATE CCTV USING MOTIONEYEOS ON THE RASPBERRY PI – EPISODE 27
Conclusion
Congratulations, you have successfully installed MotionEyeOS on your Raspberry Pi and gained a deeper understanding of its features and capabilities. With its intuitive web interface and extensive range of customization options, MotionEyeOS offers endless possibilities for various projects and use cases. Whether it is for home surveillance, wildlife monitoring, or any other application that requires motion detection, MotionEyeOS has got you covered. Get creative, and explore all that MotionEyeOS has to offer – the sky’s the limit! So, keep tinkering and pushing the boundaries with this powerful and versatile operating system. Happy exploring! Remember to always have fun while learning and experimenting with new technologies.
References
- https://randomnerdtutorials.com/install-motioneyeos-on-raspberry-pi-surveillance-camera-system/