Do you want to get the most out of your Raspberry Pi? Have you been wanting more speed and power when powering it up? Look no further. Fast booting a Raspberry Pi has become much simpler recently. In this article, we’ll show you exactly how to do it so that you can get the most out of your system. We’ll also explain why fast-booting is essential for a wide range of applications from robotics to home automation projects and other uses. By the end, you will have all the information necessary to ensure your Raspberry Pi is set up correctly and ready for action!
What is Raspberry Pi and What are the Features?
The Raspberry Pi also has several features that make it unique. They include:
- GPIO (General Purpose Input/Output) pins – these allow the Raspberry Pi to interact with other components such as LEDs, motors, and sensors.
- Camera ports for connecting a camera module directly to the Raspberry Pi so you can capture images or videos.
- Software compatibility – users can access a range of software including operating systems like Linux, which is the primary OS that Raspberry Pi is based on.
- Ability to be used as a mini-computer – you can use it for tasks like web browsing, creating documents, playing games and more.
- Extremely low power consumption – it uses very little energy so you don’t have to worry about high electricity bills.
- Flexibility – it can be used to create projects like robots, home automation systems, and more.
- Low cost – it is very affordable compared to other computers on the market.
The Raspberry Pi is an amazing piece of technology that has been instrumental in allowing people to explore computing and creating projects at a low cost. It’s a great tool for teaching, learning, and having fun. With all its features and capabilities, the Raspberry Pi is an excellent choice for anyone looking to get started with computers or explore computing possibilities. [2]
What Kind of Projects is Raspberry Pi Suitable for?
Raspberry Pi is a small but powerful computer that is perfect for many different projects. It’s an ideal platform for building your own devices, from simple robots to home automation systems and more. Whether you are a beginner looking for an entry-level project or an experienced programmer wanting to expand your skills, Raspberry Pi can be the perfect fit for you! [3]
Choose among this variety of projects:
- Robotics: The Raspberry Pi is ideal for constructing robots. Use its GPIO pins and other components to create a machine that can be programmed to move and respond to commands.
- Home Automation: With the right programming, you can control lights, appliances, and other devices in your home using your Raspberry Pi. You can also use it for monitoring and tracking energy usage.
- Media Center: Turn your Raspberry Pi into a powerful media center, and stream audio and video content to any device in the house.
- Games Console: The Raspberry Pi can be used as a powerful games console capable of playing modern PC games at full resolution with excellent performance, thanks to its dedicated GPU.
- Internet of Things (IoT): With the help of sensors and other components, you can connect your Raspberry Pi to the internet and create a powerful IoT system.
- Programming: Whether it’s Python, C++ or Java, use the Raspberry Pi as an ideal platform for learning programming languages. It’s also great for writing and testing code.
- Security and Surveillance: Build a security system with Raspberry Pi that can record video, detect motion, and alert you if anything out of the ordinary is detected.
No matter what kind of project you are looking for, the Raspberry Pi is sure to have something to offer. So why not get started on your own Raspberry Pi project today? With its low cost and easy setup, you’re sure to find something that’s perfect for your needs. [4]
Basic Raspberry Pi Models
There are four main models available on the market today: the Raspberry Pi Model A, the Raspberry Pi Model B, the Raspberry Pi Zero and the Raspberry Pi 3. [5]
- The Raspberry Pi Model A is an entry-level version of the original board, and the least expensive model in the line-up. It features 256MB of RAM, one USB port, an HDMI port and a 26-pin GPIO header.
- The Raspberry Pi Model B is the more powerful version of the original board, featuring 512MB of RAM, two USB ports, an HDMI port and a 40-pin GPIO header. It can be used for tasks such as running web servers or media centers.
- The Raspberry Pi Zero is a variant of the original board with much lower power consumption and size. It features 512MB of RAM, one micro USB port, a mini HDMI port and a 40-pin GPIO header.
- The Raspberry Pi 3 is the latest version in the line-up, and it has been upgraded with more powerful hardware specifications such as 1GB of RAM, four USB ports, an HDMI port and a 40-pin GPIO header. It can be used for projects such as media centers, home automation and robotics.
The Raspberry Pi is an incredibly versatile device that can be used for a variety of projects ranging from basic programming to complex robotics. As the hardware specifications improve with each iteration, more possibilities are opened up to create exciting projects with this small but powerful device. [6]
Why Fast Boot Raspberry Pi?
When it comes to fast booting Raspberry Pi, there are a few key reasons why this can be beneficial. Fast booting your Raspberry Pi allows you to quickly and easily get up and running with your projects in no time. Here are the key reasons why you should consider fast booting Raspberry Pi:
- Increased Performance – Fast booting your Raspberry Pi will increase its performance significantly. The more quickly it can boot up, the faster you and your projects will be running.
- Reduced Cost – Fast booting Raspberry Pi saves money by reducing energy consumption and aiding in longer-lasting hardware components. This reduces the cost associated with purchasing new components to replace older ones that have died out over time.
- Easier to Get Started – Fast booting Raspberry Pi makes it easier for beginners and experts alike to get up and running with their projects quickly, without any hassle.
- Improved User Experience – With faster boot times, users will have a more enjoyable experience while working on their projects. The faster the system is able to access data, the smoother and more pleasant the experience will be.
- More Time for Development – Faster booting times also give developers more time to focus on the development of their projects, rather than spending time waiting for the system to boot up and become ready for use.
- Increased Efficiency – With faster booting times, Raspberry Pi devices are more efficient when it comes to accessing data and performing tasks. This can help you save time and increase productivity for any project you might be working on.
These are only some of the key reasons why fast booting Raspberry Pi is beneficial. Fast booting your Raspberry Pi allows you to get up and running with your projects quickly and efficiently, saving you time and money in the long run. It also helps to ensure a more enjoyable user experience when developing on this platform. With all these advantages, fast booting Raspberry Pi is certainly worth considering for any project. [7]
What You Will Need in Order to Fast Boot Raspberry Pi?
In order to maximize the performance of your Raspberry Pi device, you might want to consider setting up fast boot on it. This type of setup significantly reduces the amount of time it takes for the device to start up and can help keep your Raspberry Pi running smoothly at all times. So let’s discuss what you need in order to set up a fast boot environment:
- Operating System: The most important thing you will need in order to set up fast boot on your Raspberry Pi is an operating system (OS) that supports the feature. This typically includes Linux-based OSs such as Raspbian, Ubuntu Mate, and LibreELEC.
- Storage Drive: Next, you’ll need a storage drive that is compatible with your specific Raspberry Pi device. This can be either an SD card or a USB flash drive, but it should have enough room to store the OS and any additional software you wish to install.
- Bootloader: You will also need a bootloader installed on the device in order for fast boot to work properly. Popular options include U-Boot and GRUB.
- Power Supply: Finally, you’ll need to make sure you have the right power supply for your Raspberry Pi device. This should be a high-quality power supply with enough wattage to keep it running smoothly during boot-up.
Once you have all the components necessary to set up fast boot on your Raspberry Pi, it’s time to get started with the process. Use our detailed guide to learn how to properly install and configure the feature so that you can enjoy faster start times and a more efficient user experience. Good luck! [8]
How to Fast Boot Raspberry Pi – A Step-by-Step Guide
Step 1: Set up the SD Card
Once you have your Raspberry Pi, the first step is to set up the microSD card. It is important to ensure that it has a good read and write speed, as this will dictate how fast your Raspberry Pi can boot. For best results, we recommend an SD card with at least 16GB of storage, and a minimum Class 10 or UHS-1 rating.
Step 2: Set up your Raspberry Pi OS
Now that you have your SD card ready, it’s time to install the operating system (OS) on your Raspberry Pi. You can download an image of any official OS from the Raspberry Pi website. The most commonly used OS is Raspbian, which is a free Debian-based system that comes with the Raspberry Pi. Once you have downloaded the OS image, use an application like Etcher to write it to your SD card.
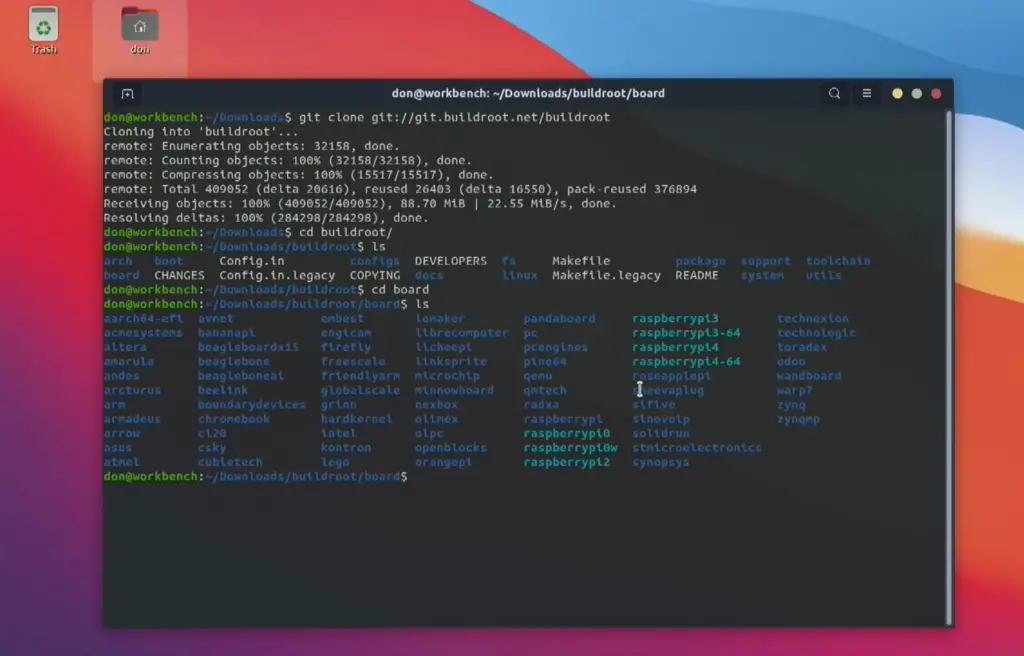
Step 3: Configure Your Raspberry Pi
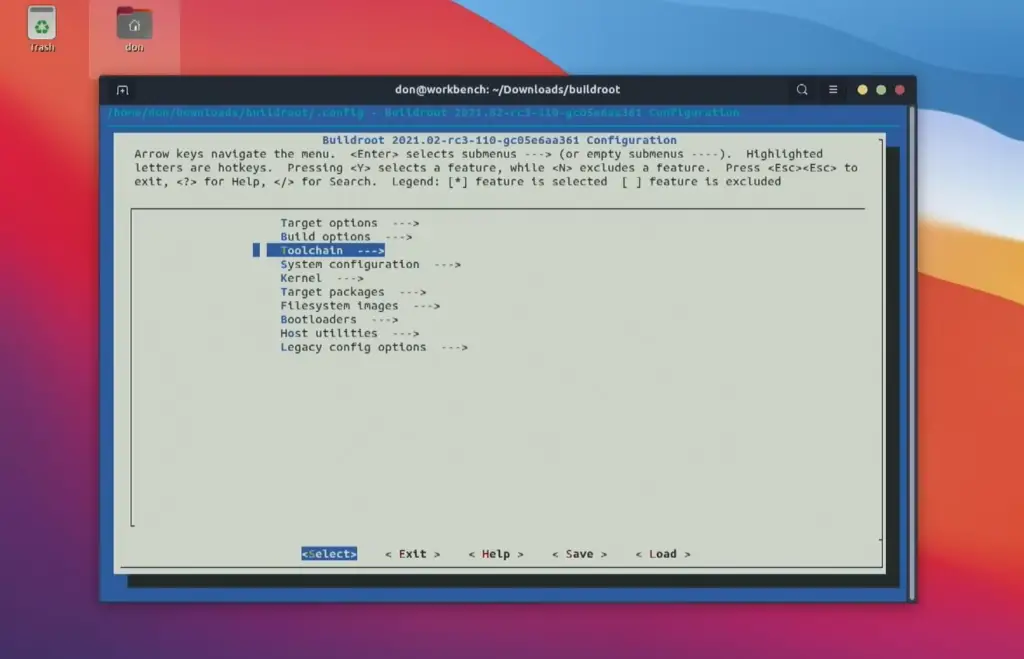
Once you have set up the OS on your Raspberry Pi, it’s time to configure it for fast booting. To do this, open the Raspberry Pi configuration menu using `sudo raspi-config`. From here, you can adjust several settings to optimize your Raspberry Pi’s performance such as setting up the GPU memory split and overclocking it.
Step 4: Configure Boot Options
In the same configuration menu, navigate to the `Boot Options` tab and make sure that the option `Wait for Network at Boot` is enabled. This will ensure that your Raspberry Pi does not wait too long to boot up, which can significantly reduce its boot time.
Step 5: Disable Unused Services
The last step in optimizing your Raspberry Pi’s boot speed is to disable any services or modules that are not in use. This can be done by using the Raspberry Pi’s boot configuration utility (BCM). Open it up and select the `Disable Unused Services` option to identify and disable any unnecessary processes that may be slowing down your Raspberry Pi’s boot speed. [9]
Is Fast Boot Raspberry Pi Secure?
The Raspberry Pi is an incredibly powerful and cost-effective platform for a wide range of projects. Due to its low power consumption, it’s especially popular among DIY hobbyists and engineers who want to create custom electronic applications. But when it comes to security, there are some questions that remain unanswered: is fast boot Raspberry Pi secure?
To answer this question, it’s important to understand the basic security features of Raspberry Pi. By default, all systems are configured with a secure boot loader that prevents malicious code from running. This means that even if an attacker were to gain physical access to your device, they wouldn’t be able to load any unauthorized software or execute commands on your system without a password. Additionally, the Raspberry Pi also comes with a dedicated Network Security Toolkit (NST) to help you further secure your system if desired.
When it comes to fast boot Raspberry Pi, some people opt for additional manual steps as an extra layer of security. For instance, if you’re using an SD card with your Raspberry Pi, you can take the extra step of mounting it in read-only mode to prevent any malicious code from being written to your system.
Overall, fast boot Raspberry Pi is a secure platform for running various applications and projects as long as you take the necessary precautions. By keeping your OS current, using strong passwords, and taking manual steps such as mounting an SD card in read-only mode, you can be sure that your Pi is as secure as possible. With these measures in place, you can rest assured that your projects will remain safe from malicious interference. [10]
How to Improve the Security of Raspberry Pi?
Raspberry Pi is a powerful and popular single-board computer for hobbyists, students, and professionals. Its low cost and small size make it an attractive choice for building projects of all kinds. But as with any other computing system, there are security risks associated with Raspberry Pi that can be addressed by taking some simple steps to protect your device from malicious actors.
1 Step: Secure Your Wi-Fi Network Connection
The first step to improving Raspberry Pi security is to secure your Wi-Fi network connection. This means using a strong, unique password and enabling the latest encryption protocols such as WPA2 or WPA3 personal. You should also avoid connecting to public networks and use a virtual private network if you need to access remotely.
2 Step: Set Up a Firewall
Another step to boost Raspberry Pi security is to set up a firewall. A firewall will help protect your device from malicious attacks by filtering out incoming and outgoing network traffic. You can use the built-in Linux firewalls such as iptables, or you may wish to install third-party software solutions such as ZoneAlarm or Little Snitch.
3 Step: Restrict Access to the Device
Raspberry Pi can be accessed over a network, so it’s important to limit who has access. You can do this by limiting the IP addresses that can connect to your Raspberry Pi and setting up an authentication system such as SSH keys and passwords. It’s also important to keep your Raspberry Pi up-to-date with the latest security patches and updates.
4 Step: Enable Security Logging
Consider enabling security logging on your Raspberry Pi. This will help you monitor any suspicious activity that may be occurring on your device or network. You can use third-party tools such as Logwatch or OSSEC to monitor system logs and detect any potential threats.
By following these steps, you can help ensure that your Raspberry Pi remains secure and protected from malicious actors. With a little bit of effort, you can rest assured that your device is safe and sound – allowing you to focus on creating great projects! [11]
FAQs
How to make Raspberry Pi bootable?
The simplest way to make a Raspberry Pi bootable is to use a USB drive that has been formatted with the FAT32 file system. By formatting this drive in this manner, you will be able to copy the necessary files to the USB drive so that your Raspberry Pi can recognize the device and boot up without any problems. Todo this, you should first connect your USB drive to your computer, then launch the Disk Utility application. Once in Disk Utility, select the checkbox next to “Format as FAT 32” and click the “Apply” button to begin the process.
How fast is a Raspberry Pi CPU?
The Raspberry Pi is a single board computer system that is based on the ARM architecture. As such, its CPU performance depends on which model of Raspberry Pi you have, as each one has different specifications. Generally speaking, the higher end models such as the 4B and 4B+ are capable of running at speeds up to 1.5 GHz, while the lower end models such as the Zero and Zero W are capable of running at speeds up to 1 GHz.
How to boot Raspberry Pi through USB?
Here’s how to fast-boot your Raspberry Pi:
- Connect your Raspberry Pi to a monitor and keyboard/mouse.
- Insert the bootable USB drive into a port on the Raspberry Pi.
- Power up the Raspberry Pi by plugging in the power supply cable.
- On bootup, press “ key or “ during startup for Raspberry Pi 4, to enter the boot menu.
- Select your desired USB drive from the list of bootable devices.
- Once you have selected a device to boot from, your Raspberry Pi should start up with the OS installed on that drive.
- To switch back to a different operating system, simply select it in the same way as before.
- To return to the SD card OS, you will need to go back into the boot menu and select “Default” as your boot option.
How fast can a Raspberry Pi boot?
The exact time it takes to boot up depends on several factors, such as the OS you’re running and the configuration of your Pi. If you’re using Raspbian, for example, it will typically take between 6-10 seconds to boot up fully. This is because Raspbian comes preloaded with all the necessary drivers to support the Pi’s various components.
Useful Video: Raspberry Pi: Fast boot Raspberry Pi
The Bottom Line
With Raspberry Pi’s relatively simple design and capabilities, you can achieve a faster boot speed without spending too much time or money on the process. Whether it’s for development streaming purposes or just more day-to-day operations, optimizing your Raspberry Pi to fast boot will make your life easier in the long run. Ultimately, you need to understand that there are no quick fixes when it comes to speeding up boot times; it takes time and some effort. It’s better to spend now enough time making sure everything is set up correctly than running into problems later on. By following these steps correctly, you should find yourself with a quickly booting device that functions optimally.
References
- https://www.raspberrypi.org/help/what-%20is-a-raspberry-pi/
- https://www.spiceworks.com/tech/networking/articles/what-is-raspberry-pi/
- https://www.weareteachers.com/raspberry-pi-projects/
- https://itsfoss.com/raspberry-pi-projects/
- https://opensource.com/resources/raspberry-pi
- https://pimylifeup.com/raspberry-pi-versions/
- https://raspians.com/how-to-fast-boot-raspberry-pi/
- https://singleboardbytes.com/637/how-to-fast-boot-raspberry-pi.htm
- https://linuxconfig.org/boot-your-raspberry-pi-from-a-usb-a-tutorial
- https://www.elektormagazine.com/news/secure-boot-solution-for-raspberry-pi
- https://raspberrypi-guide.github.io/other/Improve-raspberry-pi-security




Leave a Reply