
So you’re interested in taking your Arduino projects up a notch? Lilypad may be just what you need. This Arduino variant is designed for wearables and e-textiles, making it the perfect choice for interactive clothing and fabric-based projects. In this guide, we will answer some of the most common questions about Lilypad, as well as provide useful tips to get you started. Let’s get started!
Arduino Lilypad and Its Benefits
Its main benefit is that it allows users to create projects quickly and easily without the need for complex programming or hardware expertise. Furthermore, Arduino has a wide variety of shields, components, modules, sensors and other peripherals which can be used to expand its capabilities. Additionally, there are numerous tutorials and online resources available to get started with Arduino programming.
The development environment provided by Arduino also makes it easy for users to program their creations through simple drag-and-drop commands instead of having to learn complicated coding languages like C++ or Python. Additionally, since the Arduino platform uses open-source hardware components, it allows users to customize their projects in any way they want.
Moreover, Arduino is an inexpensive platform which makes it ideal for hobbyists and students who are just starting out with electronics projects. It also has a strong community of users from around the world that can provide support, advice and tips to those just getting started with electronics. Furthermore, businesses have been using Arduino for rapid prototyping due to its flexibility and affordability.
It has several distinct advantages compared to other versions of Arduino, such as a small form-factor, low power consumption and custom connectors that make it well-suited for use in clothing or other fabric-based projects. Additionally, the unique sewable pads on the Lilypad allow users to easily attach components like LEDs, buttons and switches directly onto fabrics without needing any additional wiring or soldering.
This makes it ideal for those who are interested in creating interactive clothes, costumes or accessories with lighting effects, motors and sensors. Furthermore, due to its small size and low power consumption characteristics, Lilypad is also very suitable for use in solar powered projects.
The Lilypad also offers a range of versatile input and output connections, such as USB for programming, I2C for communication with other devices, and PWM for controlling servo motors. This makes it an ideal choice for creating interactive projects that require multiple inputs and outputs. The Arduino Lilypad is designed to be lightweight and flexible enough to be sewn into fabrics or embedded directly into clothing. That means makers can easily create wearable electronics that are comfortable and stylish. [1]
What Are the Possible Uses of Lilypad
Arduino Lilypad can be used for a wide variety of applications and projects. Below are some examples of possible uses:
- Sewing circuits into clothing to create wearable electronics
- Building robots
- Creating interactive displays
- Making musical instruments
- Designing jewelry
- And much more!
With the Lilypad Arduino, you are only limited by your imagination. The sky’s the limit when it comes to what you can create with this versatile little board. So get out there and start sewing up some Circuit Magic!
Best Arduino Lilypad Projects
The Arduino Lilypad is the perfect tool for creating innovative and interactive projects. There are so many possibilities when it comes to what you can create with this tiny board. Here are some of our favorite Arduino Lilypad projects:
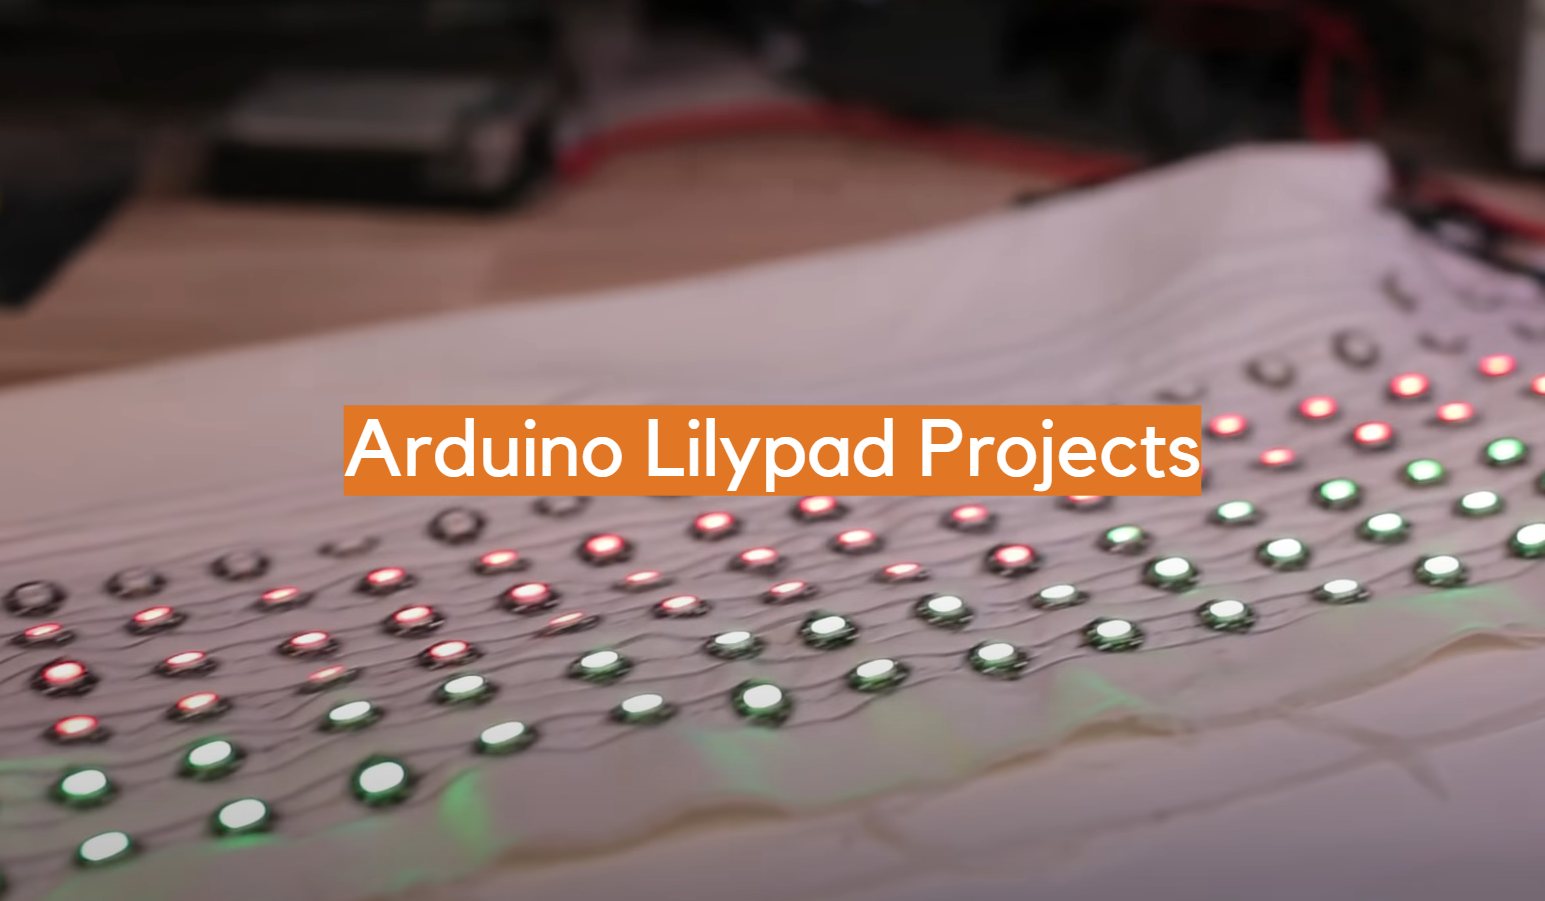
LilyPad Arduino Sensor Demo Mat
One of the most interesting projects you can create with the LilyPad Arduino is a Sensor Demo Mat. Here, you’ll learn how to wire up various sensors and connect them to the LilyPad board so that they interact with each other.
You will need:
- 1 x LilyPad 328 Main Board
- 1 x ProtoSnap – LilyPad Development Board which includes the following:
- 1 x LilyPad Simple Board
- 1 x LilyPad Button
- 1 x LilyPad Slide Switch
- 5 x LilyPad White LED
- 1 x LilyPad RGB tri-color LED
- 1 x LilyPad Light Sensor
- 1 x LilyPad Temp Sensor
- 1 x LilyPad Buzzer
- 1 x LilyPad Vibe board
- 1 x LilyPad FTDI Basic
- 2 x Conductive Thread Bobbin
- 1 x Needle Set
- 7 x sewable snaps
- 1 x Piece of fabric big enough to hold all of the sensors
- 1 x Fabric Marking pen
Now how it works is simple. First you arrange all the sensors on the fabric in the order you want. Next, use the fabric marking pen to draw a pattern of conductive lines that will connect each sensor to the LilyPad board. It’s a good idea to have a future plan in mind before you start sewing, so think about what kind of interactions and projects you want to create with the different sensors.
If you use a pen or marker, be sure to remove all the lines once you are satisfied with the pattern. After that, it’s time to start sewing! Start by threading the conductive thread through the needle and tie a knot on one end. Next, insert the needle into one of the sewable snaps and pull it until you reach your starting point for the pattern. Sew along your lines until all the sensors are connected to each other and then connect them to the LilyPad board. Once you have completed your Sensor Demo Mat, it’s time to power up and start creating interactive projects!
When you’re finished wiring up all of the components, it’s time to program them. You can use either the Arduino IDE or a variety of other programming tools available for LilyPad projects. Programming each component is fairly simple; just write a few lines of code and you should be able to get your Sensor Demo Mat working in no time. Once programmed, you can test out the demo mat by running your finger across various sensors and observing their reactions. Luckily there are a variety of resources online to help you with programming the LilyPad Arduino, so you can find tutorials and projects to get started with.
Now that you have created your Sensor Demo Mat, you can use it as a base to create more complex projects with LilyPad boards. Good luck!
Snapable Lilypads Project
The Snappable Lilypad project is a great way to get started with embedding an Arduino microcontroller into textile projects. With its simple snap construction, this project can be used in various applications including wearables, light displays and interactive art pieces.
Parts Needed:
- AWG wire
- Sewing needle
- Neoprene
- Fabric scissors
- Fabric pen
- Fine Sharpie
- Wire cutter
- Wrap/Strip/Unwrap Tool; for 30AWG
- Lilypad
- Size 4 sew on snaps
- Solder
- Soldering iron
First off, you will need to cut out the template or pattern that you want to use for your project. You can either draw it out on paper or use a computer program such as Adobe Illustrator. In our case this will be a circle. Keep in mind that the template needs to be bigger than the Lilypad and its components, so make sure to leave a minimum of ¼” margin around each piece. Once you have your template ready, place it on top of some neoprene and use scissors or a knife to cut out your design. Use a marker or pen to transfer the pattern onto the neoprene and then cut it out.
Next, you need to attach the Lilypad to your design by either snapping or sewing on some of the sewable snaps. Either way will work but we prefer using the snaps since they are easier to remove if needed. Place your Lilypad on top and mark the holes for the snaps. Put the Lilypad aside and then pierce the neoprene with a sewing needle and attach the snaps. Then, create radiating lines extending from the openings of the LilyPad.
Now it’s time to sew it all up. Start by cutting a length of 30AWG wire and strip the ends about 1/4″ from the end. Then thread the conductive thread through the needle, and tie a knot on one end. Insert the needle into one of the sewable snaps and pull it until you reach your starting point for the pattern. Sew along your lines until all the sensors are connected to each other and then connect them to the LilyPad board. Finally, add straps to attach your project onto a garment or wherever else you plan on wearing it. At last, you’ll need to program the board. You can use either the Arduino IDE or a variety of other programming tools available for LilyPad projects.
Programming each component is fairly simple; there are a variety of tutorials available and you should be able to get your Snappable Lilypad project working in no time. Once programmed, you can test out the snappable lilypad by running your finger across various sensors and observing their reactions. [2], [3]
FAQ
What can I use the Arduino LilyPad for?
It can also be used for other creative projects that involve controlling electronics or sensing data from the environment.
The LilyPad Arduino has many components that allow it to interact with its environment, such as sensors, buzzers, LEDs, buttons, switches, batteries and much more. Some of the most popular uses for this board include creating interactive clothing items like purses and scarves that light up in response to external stimuli; constructing educational toys like robots and musical instruments; designing displays for art installations; making electronic jewelry; and even constructing custom circuit boards for hobbyists.
What is the difference between Arduino Uno and LilyPad?
The Arduino Uno and the LilyPad are both open source microcontroller boards that have been designed to make it easier for people to build interactive electronic projects. However, they differ in terms of size, power requirements and features.
The Arduino Uno is a larger board with more pins available for connecting external components such as sensors or displays. It can also be powered directly from an AC wall outlet whereas the Lilypad requires a battery. In addition, the Arduino Uno has more memory, speed and computation power than the LilyPad due to its Atmel ATmega328P microcontroller chip while the LilyPad uses an Atmel ATmega168V-10AU microcontroller chip which is less powerful.
Is the Arduino LilyPad waterproof?
Indeed, the Arduino LilyPad is waterproofed and was designed to be used in wet environments. The board itself is made of a waterproof fabric that is machine washable, making it perfect for wearable projects or projects that require water. You can even hand wash it without issues!
However, you should be aware that the electronic components are not waterproofed like the board itself, so make sure to keep them away from water. Additionally, if you submerge the Arduino LilyPad in water for long periods of time, it may damage or corrode some of the components. So it is best practice to use a waterproof enclosure when using your Arduino LilyPad in wet environments.
How do I connect LilyPad to Arduino?
The LilyPad is designed to work with Arduino boards and can be connected using a USB cable. To connect the LilyPad, align the pins on the board with those on the Arduino board. Make sure that all of the pins are lined up properly before connecting them. Once all of the pins are aligned, insert one end of the USB cable into the Arduino board and then insert the other end into a USB port on your computer. The connection should now be established and you can begin programming your project!
Useful Video: 5 Tips for Beginners in DIY Wearables
Conclusion
Arduino LilyPad projects can be a great way to explore the basics of electronics and programming. With a few basic components, there’s no limit to what you can create! You can use LilyPads and other Arduino boards for all kinds of projects, from blinking LEDs to motion sensors.
The best way to get started is to familiarize yourself with the components of a LilyPad project and gain experience by trying out some simple examples. Once you’ve mastered those, then the sky is truly the limit when it comes to creating your own unique and innovative designs!
But remember, there’s plenty more to learn about working with LilyPads, so be sure to keep exploring new techniques as you continue your journey into the world of Arduino projects. Have fun!
If you want to learn more about working with Arduino LilyPad projects, then be sure to check out our other guides and tutorials for even more great tips and ideas. Good luck!
Happy creating! With the right knowledge, patience, and practice, you can make amazing things with your Arduino LilyPad boards. Have fun!
References
- https://www.mouser.com/catalog/specsheets/lilypad.pdf
- https://www.instructables.com/LilyPad-Arduino-Sensor-Demo-Mat/
- https://www.instructables.com/Snapable-Lilypads/