
Are you looking to get the most out of your Raspberry Pi projects? With a Raspberry Pi Remote Device Management Guide at your fingertips, you can now tackle complex and robust projects with ease. This guide helps users manage their devices remotely so that they can access them from any location. Whether it’s controlling hundreds of sensors for a weather monitoring network or streaming music over your home WiFi, the remote device management makes it all possible! Read on as we discuss this invaluable addition to the already formidable arsenal of features provided by the Raspberry Pi platform.
What is a Raspberry Pi?
It was originally designed as an educational tool to help teach the basics of computing and programming. The most common use is for Home Automation, Robotics and Media Centers Projects. The Raspberry Pi also has many support programs available such as Raspbian, Linux and Windows 10 IoT Core. It offers both the capability to wirelessly connect with peripherals (such as keyboards, mice and displays) as well as allowing remote access from other network devices using SSH, VNC or RDP protocols.
The Raspberry Pi is powered by a Broadcom BCM2837 ARM Cortex-A53 processor which allows it to operate in a low-power mode while still providing plenty of processing power. It also features integrated graphics processors to help with video and audio playback, as well as dedicated RAM modules for faster performance. The Pi is capable of running several operating systems including Raspbian, Ubuntu, Windows10 IoT Core or any other Linux distro.
The Raspberry Pi can be used for many different projects such as coding, creating a media center, robotics and home automation. With its broad range of support software available it’s easy to find the right setup that fits your project needs. Further customization can be achieved using additional peripherals such as displays, cameras and sensors for enhanced capabilities. [1]

The Benefits of Using a Raspberry Pi Remote Device Management System
A Raspberry Pi remote device management system offers numerous benefits for users. By using a Raspberry Pi, you can manage multiple devices across a wide variety of networks, allowing you to better control and monitor your environment. With the flexibility that comes with Raspberry Pi, users can choose the right setup for their needs.
Using a Raspberry Pi as a remote device management system allows users to install software packages such as Home Assistant, Node-RED, and others to automate tasks and easily configure settings or actions based on various triggers. This makes it easy for users to adjust automation rules according to their own requirements without much technical knowledge.
Raspberry Pis also offer better security than other systems due to their ease of use when configuring security settings. With the Raspberry Pi’s built-in firewall, users can restrict access to certain devices by IP address or MAC address. This makes it easier for users to control who has access to their network and which devices are used on their network.
Raspberry Pis also offer scalability, so users can easily add more devices as needed without having to worry about system resources. Additionally, since most Raspberry Pis are powered via micro-USB, they can be connected directly to a power source and will remain operational even when not being used. This allows users to keep their systems running at all times so that they’re always up-to-date with the latest software packages and settings.
In addition to these benefits, using a Raspberry Pi remote device management system makes it easier to troubleshoot and fix problems. By using the various software packages available with the Raspberry Pi, users can access logs and other data to quickly identify issues and resolve them on their own without needing technical assistance.
Overall, using a Raspberry Pi as a remote device management system offers many benefits such as increased security, scalability, automation capabilities, and easy troubleshooting. With its flexible setup options and powerful features, Raspberry Pi is an ideal choice for those looking to manage multiple devices across a wide variety of networks. [2]
How to Get Started with Raspberry Pi Device Management?
To get started with Raspberry Pi device management, you will need a Raspberry Pi board and the necessary accessories. The most important accessory is an internet connection, as you will be using this to connect your devices to the network. You can use either Wi-Fi or Ethernet for this purpose. Additionally, you may also need a power source and USB peripherals such as a keyboard and mouse for setup purposes.
Once your Raspberry Pi is set up with all the necessary hardware, you should install any necessary software onto it. This usually includes an operating system such as Raspbian or Ubuntu Mate, along with various libraries that are needed to control different aspects of the device’s behavior. Next, it is time to configure your device for remote access. This includes setting up a secure connection and configuring the necessary permissions for users to access it. You also need to configure any network settings such as static IPs or DHCP configuration.
Once your Raspberry Pi is securely configured, you can start exploring different options available for remote device management. For example, you can use open source libraries such as Ansible and Puppet to manage multiple devices from a single server. Additionally, there are many commercial solutions like Microsoft Azure IoT Hub or Amazon Web Services IOT Core that provide an easy way to manage and track IoT devices on the cloud.
Furthermore, it can give you the necessary peace of mind knowing that your remote devices are secure and functioning properly.
Which Options Are Available for Device Management?
When it comes to managing Raspberry Pi remotely, there are several options available. Users can choose from a variety of methods, ranging from those that are built into the operating system to third-party tools designed specifically for remote device management. Let’s take a look at some of the most popular options:
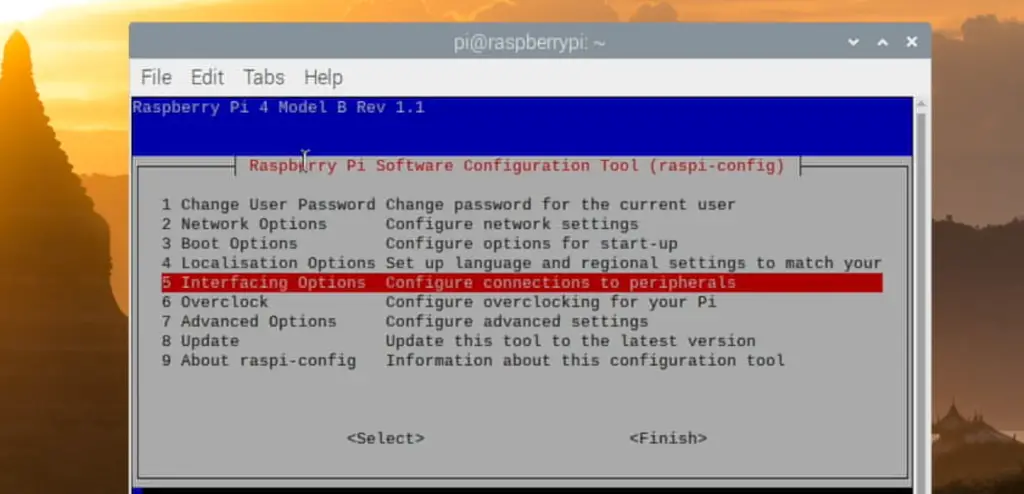
- SSH (Secure Shell): SSH is built into Raspbian and provides users with secure access to their Raspberry Pi through the terminal command line. This can be used for basic tasks such as editing files or running programs, but it is also ideal for more advanced operations like configuring network settings or installing software updates.
- VNC (Virtual Network Computing): VNC is another popular option for remote access and is pre-installed with most Raspberry Pi distributions. Unlike SSH, VNC allows users to connect to their Raspberry Pi remotely using a graphical user interface (GUI). This makes it easier to use for those who are not comfortable working from the command line.
- Remote Desktop Protocol (RDP): RDP is a Windows-based protocol developed by Microsoft that can be used to access remote computers running any version of Windows. It is included in many popular Linux distributions, including Raspbian, and provides secure access to your Raspberry Pi over the internet.
- Team Viewer: TeamViewer is a powerful remote device management tool designed specifically for managing multiple Raspberry Pis simultaneously. With TeamViewer, you can access, control, and transfer files between multiple Raspberry Pis from any computer or mobile device.
- Ansible: Ansible is a configuration management tool designed to help users manage their entire networks of computers, including remote Raspberry Pis, from one central location. This makes it easier to keep track of changes across devices and deploy updates quickly and efficiently.
No matter which option you choose for managing your Raspberry Pi remotely, it’s important to ensure that your system is secure. Make sure to set up a strong password and take advantage of other security measures like two-factor authentication when available. With the right setup in place, you can rest assured that your data and devices are safe from unauthorized access and malicious attacks. [3]

Why Is Android The Better Choice?
Android is the perfect operating system for managing Raspberry Pi devices remotely. It offers a wide range of advantages that make it the better choice over other popular operating systems like Windows and macOS.
The biggest advantage of using Android as your device management platform is its flexibility and scalability. With the Google Play Store, you can easily access thousands of apps to help manage your Raspberry Pi devices from anywhere in the world. This makes it easy to stay up-to-date with firmware updates, monitor performance metrics, adjust settings, and troubleshoot any issues you may be experiencing with your Raspberry Pi devices.
On top of this, Android’s open source nature allows developers to modify it according to their needs without having to pay licensing fees or comply with restrictive terms of use. This makes it much easier for developers to customize and extend the capabilities of Android-based Raspberry Pi remote device management tools, ensuring they are always meeting the latest industry standards.
Finally, Android’s widespread popularity means that there is an abundance of support and documentation available online, making it easy to find solutions for any problems you may encounter when managing your Raspberry Pi devices remotely. All in all, these advantages make Android a great choice for anyone looking to manage their Raspberry Pi devices from afar.
Additional Useful Features
In addition to the basic device management features, using a Raspberry Pi can provide several additional useful features. For example, you can set up a secure tunnel for remote access and use File Transfer Protocol (FTP) to securely transfer files from your computer. You can also configure Wi-Fi settings and create network shares so that devices on the same network can easily share files and data.
Additionally, you can install applications such as SSH clients directly on the Raspberry Pi to enable easy remote administration of your system.
Finally, you could also use an external USB storage device or even a secure cloud storage service with your Raspberry Pi in order to store important data safely and securely. With all these extra options available, managing a Raspberry Pi remotely has never been easier. [4]

Troubleshooting
If you need to troubleshoot your Raspberry Pi Remote Device Management setup, there are several common steps that can often help.
- Make sure that your devices are on the same network. If they aren’t connected to the same Wi-Fi or router, they won’t be able to communicate with each other.
- Check your device settings and make sure the ports needed for communication between them are open and not blocked by a firewall or other security measure.
- Try disconnecting and reconnecting all of your devices one by one, as this may reset any problems caused by misconfiguration or interference from other networks.
- Look through the logs of each device to see if there are any errors that could be causing a problem.
- Finally, if the problem persists, try reinstalling or upgrading your Raspberry Pi Remote Device Management software on each device to ensure that you have the most up-to-date version and all of its features. This will usually resolve any underlying issues that may have been causing problems with communication between devices.
Installing VNC on Raspberry Pi
VNC (Virtual Network Computing) is a remote desktop access protocol that allows users to access the Raspberry Pi from another computer or device over the internet. In order for VNC to work, it must first be installed on your Raspberry Pi.
To install VNC:
- Make sure your Raspberry Pi is connected to the internet.
- Open the Terminal window and type in “sudo apt-get install tightvncserver”. This will download and install VNC on your Raspberry Pi.
- After installation is completed, type in “tightvncserver” to start the server.
- Create a password by typing in “passwd” and entering your desired password.
- To connect to your Raspberry Pi remotely, you’ll need an IP address. To find this, type in “ifconfig” and note down the IP address that is listed under eth0 or wlan0 (depending on which connection you are using).
- Finally, open up a VNC client on your other device and enter the IP address of the Raspberry Pi followed by “:1”. You will then be asked to enter the password you created in step 4. Once done, you should be able to access your Raspberry Pi remotely!
With VNC installed on your Raspberry Pi, you can now enjoy remote access from anywhere with an internet connection. This guide has outlined the steps necessary to install VNC on your Raspberry Pi, allowing you to easily manage and control it remotely. [5]
Setting Up An Apache Web Server
An Apache Web Server is an open-source HTTP server that can be used to host web pages on the internet. It is a popular choice for hosting websites on Raspberry Pi devices due to its ease of use and flexibility. To set up an Apache Web Server on your Raspberry Pi device, follow the steps outlined below:
- Install Apache using apt-get package manager by running the command “sudo apt-get install apache2” in the terminal. This will install all required dependencies necessary for running the Apache web server.
- Configure Apache by editing the configuration file located at /etc/apache2/apache2.conf using a text editor such as nano or vi. Change any settings you wish to customize.
- Create the web pages you would like to host with Apache and place them in the /var/www/html directory, where they will be served by default.
- Start the Apache service by running the command “sudo service apache2 start” in the terminal. Verify that it is running correctly by visiting http://localhost or http://127.0.0.1 in a web browser on your Raspberry Pi device.
- Finally, if you are hosting a website publicly, configure port forwarding on your router so that external requests can reach your Raspberry Pi device and access the web pages hosted on it.
By following these steps, you should have successfully set up an Apache Web Server on your Raspberry Pi device. With the powerful and flexible Apache Web server, you can easily create and host webpages for a wide variety of applications. Your imagination is the limit!
Network Boot Your Raspberry Pi
Raspberry Pi devices can be network-booted with the help of a Network Interface Card (NIC). This ability allows for quick and easy setup, configuration, and management. To network boot your Raspberry Pi device:
- Connect the NIC to the Raspberry Pi using an Ethernet cable.
- Enable network boot in the BIOS settings of your computer or other machine connected to your Raspberry Pi via Ethernet.
- Configure the DHCP server on your local network so it can detect and assign IP addresses for each attached device when they start up.
- On the Raspberry Pi’s OS Manager (such as NOOBS), select “Network Boot” as the boot option from within Setup Mode.
- Restart the Raspberry Pi to begin network booting.
Once your Raspberry Pi has finished network booting, you can begin managing it remotely via SSH or another remote connection protocol. With this guide, you now have the tools necessary for efficient and successful remote device management of your Raspberry Pi! [6]
FAQ
How do I manage my Raspberry Pi remotely?
SSH allows you to securely access the command line of your Raspberry Pi, while VNC gives you full graphical control of your device. Both methods are easy to set up and require minimal technical knowledge.
What hardware do I need to be able to manage my Raspberry Pi remotely?
To access your Raspberry Pi remotely, you’ll need a computer with an internet connection and either an SSH client (such as PuTTY) or a VNC viewer (such as RealVNC) installed. You also need an ethernet cable or WiFi adapter connected to the Raspberry Pi.
What software do I need to manage my Raspberry Pi remotely?
To set up a remote connection, you’ll need to install the correct server software on your Raspberry Pi. For SSH, this is typically OpenSSH or similar. For VNC, RealVNC server is usually used. Additionally, you’ll need an SSH client (such as PuTTY) or VNC viewer (such as RealVNC Viewer) installed on your computer.
What are the benefits of managing my Raspberry Pi remotely?
By accessing and controlling your Raspberry Pi remotely, you can easily monitor and maintain it from anywhere in the world with an internet connection. This makes it ideal for users who want to be able to access their device without being physically present. Additionally, remote connections provide a secure way of interacting with the Raspberry Pi, as they are encrypted and require authentication.
How secure is it to manage my Raspberry Pi remotely?
Remote connections to your Raspberry Pi are highly secure. SSH and VNC both utilize strong encryption protocols to protect data that’s sent over the connection. Additionally, both types of connection require authentication (usually in the form of a username and password) before access is granted. This ensures that only authorized users can control your device.
Are there any risks associated with managing my Raspberry Pi remotely?
While remote management provides many benefits, there are some risks associated with it. By opening up an external access point into your network, you’re potentially creating a vulnerability that malicious actors could exploit. To reduce this risk, you should regularly update your Raspberry Pi’s software and use strong passwords to protect its access points. Additionally, it’s advisable to upgrade your router’s firmware to the latest version for added security.
What additional resources are available for managing my Raspberry Pi remotely?
The official Raspberry Pi website has a wide range of useful resources that can help you learn more about remote device management with the Raspberry Pi. This includes guides on setting up SSH and VNC connections, as well as information on how to secure and maintain them. Additionally, there are many third-party websites dedicated to helping users get started with remote access technologies such as SSH and VNC. Finally, forums like the official Raspberry Pi forum provide an excellent source of support and advice.
How do I access my Raspberry Pi from an outside network?
You can access your Raspberry Pi from an outside network using a secure shell (SSH) protocol. SSH allows you to log into the remote device and execute commands as if you were sitting in front of it. To set up SSH, you will need to enable port forwarding on your router so that incoming requests are directed to the Raspberry Pi’s IP address. Once this is done, you can use an SSH client such as PuTTY or MobaXterm to connect to the device remotely. It’s also possible to remotely access the Raspberry Pi’s graphical user interface (GUI) with VNC (Virtual Network Computing). This requires setting up a VNC server on the Raspberry Pi and then connecting via a VNC client such as TightVNC or RealVNC.
How to access Raspberry Pi remotely without a screen?
If you do not have a monitor or keyboard available for your Raspberry Pi, you can access it remotely via SSH (Secure Shell) using a command-line interface. You will need to make sure that your Raspberry Pi is connected to the same network as the computer that you are using and then use an SSH client such as PuTTY to establish the connection. The first step is to find out the IP address of your Raspberry Pi. To do this, run ‘sudo ifconfig’ in Raspbian Terminal and look for wlan0. The IP address should be listed next to “inet addr”. Once you’ve obtained the IP address, launch PuTTY on your computer and enter the IP into the Host Name field.
When prompted, enter your Raspberry Pi username and password to gain access. You can now run any command-line commands you like to control your Raspberry Pi remotely!
Useful Video: How to remote screen access to your Raspberry Pi from MacOS/Windows
Conclusion
The Raspberry Pi Remote Device Management Guide has provided an overview of the various tools available to remotely access and manage a Raspberry Pi device. Using SSH, VNC, or even RDP, users can easily connect and interact with their Raspberry Pi devices in a secure manner from any location. Additionally, with remote access comes the ability to control system settings, install software updates, configure hardware peripherals and much more. The combination of these features makes it easy for anyone to manage their Raspberry Pi remotely. With the right knowledge and tools at hand, managing your Raspberry Pi remotely is now easier than ever!
References
- https://qbee.io/raspberry-pi-device-management-comprehensive-guide/
- https://jfrog.com/connect/post/raspberry-pi-remote-management-and-linux-update/
- https://www.raspberrypi.com/documentation/remote-access/
- https://emteria.com/blog/raspberry-pi-fleet-management
- https://peppe8o.com/raspberry-pi-remote-management-and-access-tools/
- https://raspberry-pi-device-management-platform.com/
- https://lifehacker.com/how-to-control-a-raspberry-pi-remotely-from-anywhere-in-1792892937