
If you’re interested in creating a system monitor for your PC using Raspberry Pi, then this blog post is for you! As technology has become increasingly advanced and innovative over the years, so have our ways of managing and monitoring our systems. With the introduction of Linux-based microcontroller boards like Raspberry Pi, we can now build powerful yet cost-effective projects to track the health status of our PCs. By following this guide, you’ll learn how to utilize your Raspberry Pi board to measure various metrics from your PC such as CPU temperature, GPU load/clock speed, memory usage etc., and display them on an easy-to-read user interface. So start building your very own home monitoring device – it will be worth every minute!
What is Raspberry Pi and What are Its Features?
Raspberry Pi comes with several features that make it stand out from just about any other computer. They cover:
- High Performance: Raspberry Pi can be used to do traditional desktop computing tasks like running office applications, web browsing, playing music and videos. It’s powered by a 700MHz ARM11 processor with 512MB of RAM (which is expandable).
- Easy Setup & Software Options: The setup process for the Pi is very straightforward and you can get up and running in no time. You can also easily install several different Linux distributions, Windows 10 IoT Core or media center software like OSMC on the Pi.
- Low Cost: At around $35 (depending on the model), Raspberry Pi is very affordable compared to other computers. And it’s even cheaper if you opt for a second-hand device.
- Size: The Raspberry Pi is incredibly small and lightweight, making it the perfect device for your home or office. It’s also very energy efficient, so you don’t have to worry about high electricity bills.
- Hardware & Software Support: Because of its popularity, a wide range of hardware and software support is available for the Raspberry Pi. You can find a huge number of tutorials, projects, and user guides that make it easy to get started with the Pi.
- Versatility: Thanks to its small size and powerful processor, Raspberry Pi can be used for many different projects. From serving as a home media center or running retro games to creating retro arcade machines and smart home hubs, the possibilities are endless!
The Raspberry Pi is an amazing device that can be used for a variety of projects. Whether you’re a beginner or an experienced user, it has something to offer everyone. So go ahead, pick up a Raspberry Pi and start exploring the world of computing! [2]
How Can Raspberry Pi Be Used as a Monitor?
Raspberry Pi is a powerful, low cost, and small single-board computer. It has become increasingly popular for use in a variety of projects due to its ease of use and affordability. One way Raspberry Pi can be used is as a monitor. A Raspberry Pi-based monitor offers several advantages over traditional monitors, including portability, flexibility, and lower power usage.
Using a Raspberry Pi as a monitor requires connecting the device to a display and setting up the necessary software. This can be done using an HDMI cable, DisplayPort connection, or DVI adapter depending on what type of display you have. Once connected, the Raspberry Pi will need to be set up with an operating system (such as Raspbian) and the necessary software to display output from your computer.
Once set up, you can use a Raspberry Pi as a monitor in several ways, including:
- Displaying data from other computers
- Screencasting or mirroring content from your laptop or smartphone
- Watching videos or movies stored on the device
- Viewing images or photos
- Using as an extra monitor for your main computer
- Connecting to a security camera or CCTV system
Given the portability and flexibility of a Raspberry Pi, it can be an ideal choice if you’re looking for a more cost effective monitor solution. With its low power usage, it’s also great for those who want to conserve energy. Additionally, because it is so versatile and customizable, you can tailor your Raspberry Pi monitor to fit your specific needs. [3]
Who Needs a Raspberry Pi?
If you’re looking for a powerful yet affordable computer, the Raspberry Pi is an excellent choice. It’s perfect for DIY enthusiasts and tech-savvy users who want to build their own custom systems with minimal hassle. Not only can you save money by building your own PC, but you can also use the Raspberry Pi to monitor other systems or create unique computing projects. [4]
Using a Raspberry Pi to monitor your home or office environment is an excellent way to stay on top of changes and be alerted when something’s amiss. For example, you could create a temperature sensor with a Raspberry Pi connected to a thermometer that would send alerts if the temperature changed significantly. You can also use the Raspberry Pi to run network backups, create custom security systems, and more.
Another great use for a Raspberry Pi is in media streaming. With the right hardware, you can stream movies or music to any device in your home — from TVs and projectors to tablets and phones. Additionally, the Raspberry Pi can be used as an audio player with built-in support for popular streaming services like Spotify and Apple Music.
The possibilities of the Raspberry Pi are nearly endless. Whether you’re a beginner looking to get your feet wet with basic computer skills or an experienced user wanting to explore more complex projects, the Raspberry Pi is sure to provide hours of entertainment and learning. Start building today with this powerful yet affordable system!
With so many potential uses for the Raspberry Pi, it’s essential to have the right tools in order to get the most out of your setup. The Raspberry Pi Official Starter Kit includes everything you need, including a case, power supply, keyboard, mouse, HDMI cable and more. Additionally, there are plenty of accessories available to customize your experience—such as heat sinks and cooling fans for overclocking or special cases with unique designs. [5]
Is a Raspberry Pi System Monitor Necessary for PC?
A Raspberry Pi system monitor is a small computer that can be used to monitor and manage computing resources. It provides the ability to measure system performance, observe usage trends, identify and diagnose potential issues before they become problems, and provide an easy-to-use interface for managing various aspects of the system environment.
The question then arises: do I need a Raspberry Pi system monitor in my PC? In order to answer this question, here are some facts about such monitors:
- It is capable of monitoring your system’s resources such as CPU usage, RAM usage, network bandwidth, and temperatures.
- With its built-in web interface and numerous plugins, you can easily monitor your system from anywhere.
- It can be configured to alert you when certain conditions occur, such as high temperatures, low disk space, or high cpu usage.
- Furthermore, thanks to its open source nature, you can customize it to meet your exact needs – no matter how specific they are.
- Setting up and using a Raspberry Pi System Monitor is relatively easy and requires minimal technical knowledge.
All things considered, a Raspberry Pi System Monitor is an invaluable tool for any PC user who wants to have full control over their system’s performance. With its many features and ease of use, it can be a great help in optimizing your PC’s performance and reducing the chances of running into problems or unexpected errors. [6]
Step-by-Step Building a Raspberry Pi System Monitor for PCs
Are you a fan of DIY projects? If so, then you’re in the right place! Here’s how to create your own Raspberry Pi system monitor for PCs:
- Gather the necessary materials – You’ll need a Raspberry Pi 3 or later model with an SD card loaded with Raspbian operating system, an HDMI cable, a USB keyboard and mouse, a monitor with an HDMI port, and an Ethernet cable.
- Connect the components – You’ll need to connect the Raspberry Pi to your monitor via the HDMI cable, then plug in the USB keyboard and mouse as well as the Ethernet cable to access the internet if necessary.
- Install the necessary software – The Raspberry Pi will need to have Python installed, as well as a few other packages such as psutil and matplotlib. You can find detailed instructions on how to install these programs online.
- Configure the system monitor – Once you’ve got all of your components connected and your software installed, it’s time to set up the system monitor. You’ll need to write a script that will collect information from your hardware and display it on the Raspberry Pi’s screen.
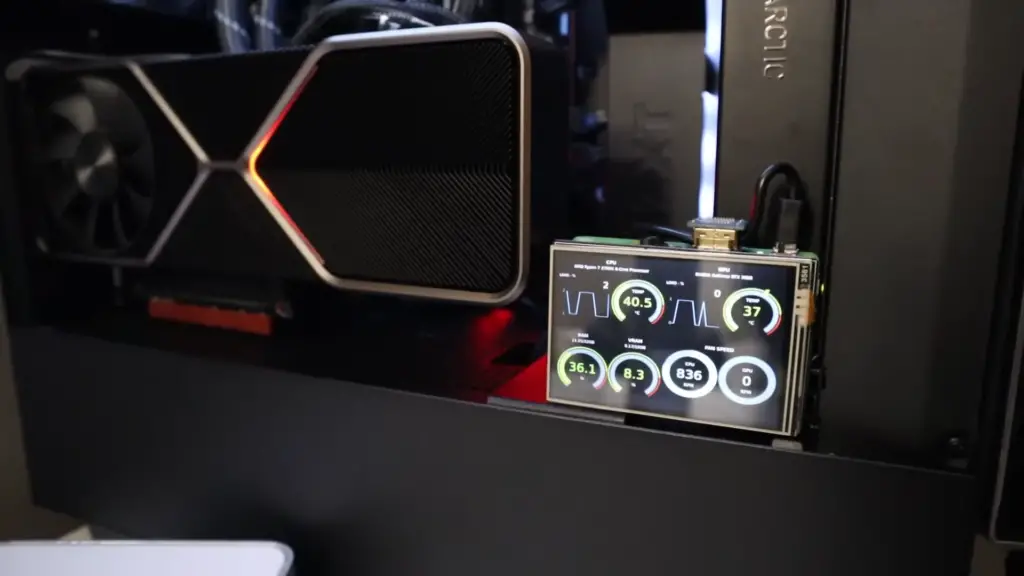
- Build your own dashboard – Finally, you can customize how you want the data to be displayed by creating your own dashboard with interactive charts or graphs. With this setup, you’ll be able to quickly and easily track the performance of your PC in real time.
Now that you know how to build a Raspberry Pi system monitor for PCs, why not give it a try? With just a few components and some code, you can be up and running in no time! Have fun! [7]
How to Customize Raspberry Pi System Monitor?
In this tutorial, we will show you how to customize a Raspberry Pi system monitor.
Step 1: Install the Prerequisites
Before you can start customizing your system monitor, you will need to install some prerequisites.
The first thing you need is an operating system with a graphical interface such as Raspbian or Ubuntu Mate. Next, make sure you have installed Python 3, the PIP package manager and all other necessary libraries.
Step 2: Set up a Raspberry Pi System Monitor
Once you have the prerequisites set up, you can start setting up your Raspberry Pi system monitor. To do this, you will need to install the appropriate software packages.
First, install the ‘htop’ utility which is a system resource monitor that runs in the terminal. You can also install ‘lm-sensors’ to get real-time readings of your system’s temperature, fan speed and other hardware information.
Step 3: Customize Your System Monitor
Once you have the basic setup done, you can start customizing your Raspberry Pi system monitor. You can choose from a variety of themes and color schemes to make the system monitor look and feel exactly the way you want it.
You can also customize the data that the system monitor displays. For example, you can add CPU usage, RAM usage, network traffic, temperature readings and more in order to get a complete overview of your system’s performance.
Step 4: Create Automated Notifications
The last step is to create automated notifications for when certain conditions are met. For example, you can set it up so that the system monitor sends an email alert if the CPU temperature goes over a certain threshold or the network traffic exceeds a certain limit. This will help keep you informed of any potential issues with your system.
Step 5: Enjoy Your Customized Raspberry Pi System Monitor
Once you have followed the steps above, you will have a customized and automated Raspberry Pi system monitor that will keep you informed about the performance of your system. You can now enjoy having better control over your system and its resources!
Now that you know how to customize a Raspberry Pi system monitor, you can keep track of your system’s performance and take the necessary steps to ensure its optimal operation. With a custom system monitor, you will be able to identify potential issues quickly and take action before it becomes too late. [8]
How to Customize the PC Status Monitor Panel?
The PC Status monitor panel on the Raspberry Pi can alert you to potential problems such as low power, over temperature protection, and other issues with your device. It can also be customized to display additional information like disk drive usage, system load average, and more. Here’s how you can customize the status monitor panel:
- Log onto your Raspberry Pi using `ssh`, `putty`, or the desktop interface.
- Open the Terminal and enter `sudo raspi-config`. This will open up the Raspberry Pi Configuration Tool.
- Select “Enable PC Status Monitor Panel” and then click “Ok”.
- Click on the Advanced Options tab to customize the Panel’s settings, including the text color, background color, font size and more.
- Once you’ve selected your customizations, click “Ok” to save them.
- Close the configuration tool and restart your Raspberry Pi for the changes to take effect. [9]
How is Raspberry Pi Different from Desktop Computers?
The Raspberry Pi is an affordable and versatile single board computer that has revolutionized the way people think about computing. It has been around since 2012, and in recent years it has become increasingly popular because of its affordability and lack of bulky hardware requirements. Unlike traditional desktop computers which require additional hardware components like a monitor or keyboard to function, Raspberry Pi is a credit-card sized computer that can be powered by various input sources, such as USB port or microUSB power adapter. With its small form factor and low power needs, the Raspberry Pi has revolutionized the way people think about computing and has become an ideal choice for hobbyists, educators, students, and professionals alike.
The main differences between the Raspberry Pi and a desktop computer are mainly in processor power, memory capacity, and portability. A Raspberry Pi has a much lower processing speed than a traditional desktop, as it is powered by an ARM processor instead of an x86 Intel processor. Additionally, its RAM is limited to only 8GB depending on the model you choose. While this might not be enough for some applications, it provides sufficient power to run basic programs like web browsers and office suites.
In conclusion, while the Raspberry Pi has its limitations compared to a traditional desktop computer, it still offers a unique experience that makes it an excellent choice for certain users. Its combination of affordability and portability make it the perfect choice for those looking for flexibility in their computing needs. With its ability to run common applications, the Raspberry Pi is a great option for both hobbyists and professionals alike. By taking advantage of its low power requirements, users can enjoy powerful computing capabilities on the go.
Additionally, with the wide range of accessories available for the Raspberry Pi, it is possible to customize and extend its capabilities further. This means that anyone can tailor their Raspberry Pi experience to suit their own needs. Through various add-ons such as cameras, gamepads, or additional RAM, users can create a truly unique, powerful computer. With its combination of affordability, portability and versatility, the Raspberry Pi is an ideal choice for both novices and experts alike. [10]
FAQs
Can you use a Raspberry Pi as a monitor?
Yes, it is possible to use a Raspberry Pi as a monitor. The Raspberry Pi can be used in conjunction with an HDMI display and a compatible keyboard and mouse. This setup allows users to access the Raspberry Pi’s operating system, programs, and features directly from their computer screen. Furthermore, the Raspberry Pi supports most monitors with an HDMI input so you can easily find a monitor that fits your computing needs. So, if you’re looking for an affordable and capable monitor, a Raspberry Pi is definitely worth considering!
What are the advantages of using a Raspberry Pi as a monitor?
The advantages include cost-effectiveness, portability, and flexibility. The Raspberry Pi is an incredibly affordable device, making it a great choice for those on a budget. Furthermore, the Raspberry Pi is lightweight and small in size, allowing users to easily move it around and use it as needed. Additionally, the Raspberry Pi offers flexibility since you can attach different peripherals and configure your setup however you like. All of these factors make it an excellent choice for those looking for a cost-effective and versatile monitor.
How do you connect a Raspberry Pi to a PC?
A Raspberry Pi can easily be connected to a PC using an HDMI cable or by connecting the Pi’s USB port with a USB-to-serial converter. The connection will enable you to control your Raspberry Pi from your PC, while still allowing you to access all of its features and capabilities. In order to connect the two devices, you will need a few components:
- HDMI cable or USB-to-serial converter
- An SD card (or other type of storage media)
- A power supply for the Pi
- A keyboard and mouse
- Network connection from your PC to the Pi (Optional)
- Monitor for your Raspberry Pi (Optional)
How do I display my Raspberry Pi on my laptop?
The simplest way to monitor your Raspberry Pi is by using a program called VNC Viewer. This software will allow you to view the Raspberry Pi’s desktop directly from your laptop, and control the Raspberry Pi with your laptop’s keyboard and mouse. Here are the steps to get it set up:
- Make sure your Raspberry Pi is connected to the same network as your laptop (either via Ethernet or Wi-Fi).
- Install VNC Viewer on both devices.
- On the Raspberry Pi, open the VNC Server application and make sure it’s set to accept connections.
- On your laptop, enter the IP address of your Raspberry Pi into VNC Viewer to connect.
- You should now be able to view and control the Raspberry Pi on your laptop!
Useful Video: ModBros – DIY Raspberry Pi PC Monitoring Screen
Final Thoughts
Building a Raspberry Pi system monitor can be a cost-effective way to keep track of the activity of your various PCs. It can give you real-time insights into how much energy your machines are consuming and what problems they might be facing. Furthermore, Raspberry Pi’s small size makes it highly portable and easy to integrate with laptops and other devices. Additionally, its affordability means that adding these components to your existing setup won’t break the bank. Ultimately, if you need to gain better control over your home network or get an accurate look at the data consumption of your numerous computing devices, constructing a Raspberry Pi system monitor is an investment that will truly pay off in terms of both accuracy and convenience.
References
- https://www.raspberrypi.org/help/what-%20is-a-raspberry-pi/
- https://www.spiceworks.com/tech/networking/articles/what-is-raspberry-pi/
- https://linuxhint.com/use-laptop-as-monitor-raspberry-pi/
- https://opensource.com/resources/raspberry-pi
- https://www.techtarget.com/searchitoperations/tip/What-is-a-Raspberry-Pi-used-for
- https://raspians.com/how-to-build-a-raspberry-pi-system-monitor-for-pc/
- https://medium.com/@chritin111/how-to-build-a-raspberry-pi-system-monitor-for-pc-90079df66713
- https://feriman.com/install-and-customize-rpi-monitor/
- https://www.neowin.net/guides/want-to-monitor-your-pc-vitals-heres-how-you-can-set-up-a-hardware-monitoring-display/
- https://www.cliffsnotes.com/tutors-problems/Computer-Science/49317672-2-How-is-Raspberry-PI-different-from-a-desktop-computer-2-What/