
In the dynamic landscape of technology, the Raspberry Pi has emerged as a powerful and versatile tool, redefining the boundaries of innovation and creativity in the realm of computing. As this tiny single-board computer continues to captivate the imagination of enthusiasts, educators, and hobbyists alike, it is essential to explore its vast potential across various applications.
One such area of exploration is the integration of an on-screen keyboard – a virtual interface that transcends the traditional physical input methods. This guide delves into the intricate process of setting up an on-screen keyboard on the Raspberry Pi, unraveling the steps, insights, and advantages that come with this transformational enhancement. Whether you seek to maximize portability, facilitate multilingual interactions, or provide accessibility options for diverse user groups, the utilization of a virtual keyboard brings with it a plethora of benefits.
From novice tinkerers embarking on their Raspberry Pi journey to experienced developers seeking innovative solutions, this comprehensive guide serves as an invaluable compass through the intricate landscape of configuring and employing an on-screen keyboard. Embark with us on this enlightening journey, as we unravel the art of virtual interaction and empower your Raspberry Pi experience with the seamless integration of an on-screen keyboard.
What Is A Virtual/On-Screen Keyboard?
A virtual keyboard typically appears as an on-screen layout of keys, mimicking the layout of a physical keyboard. It can be found on various devices, including smartphones, tablets, laptops, kiosks, and interactive displays. The keys are usually displayed as graphical representations, and users interact with them by touching the screen or using a pointing device, like a stylus.
One of the key advantages of a virtual/on-screen keyboard is its adaptability. It can dynamically change its layout and appearance to accommodate different languages, input methods, and user preferences. This versatility has made it a valuable tool for multilingual users and individuals with accessibility needs. Additionally, virtual keyboards have played a pivotal role in bridging the digital divide by enabling people with disabilities to communicate and interact with technology more effectively.
The rise of mobile computing has further propelled the prominence of virtual keyboards. As devices become sleeker and more compact, physical keyboard space is often sacrificed. This is where virtual keyboards step in, allowing users to retain text input functionality without compromising on the device’s form factor. They have revolutionized the way we interact with our devices, making them more portable and user-friendly.
Security and privacy considerations have also driven the evolution of virtual keyboards. In sensitive environments, such as entering passwords or confidential data in public spaces, on-screen keyboards offer protection against hardware-based keyloggers that might capture keystrokes from physical keyboards. Some virtual keyboards even incorporate advanced encryption techniques to enhance data security during input.
However, like any technology, virtual keyboards are not without limitations. Users accustomed to tactile feedback from physical keys may find the lack of haptic response less satisfying. Additionally, typing speed and accuracy might be compromised for some users, especially during prolonged typing sessions. Nevertheless, ongoing advancements in touchscreen technology, predictive text algorithms, and user interface design continue to address these challenges.
Why Should You Use Virtual Keyboards:
- Portability and Space Efficiency: Virtual keyboards are especially advantageous for devices with limited physical space, such as smartphones and tablets. With no need for bulky physical keys, these devices can maintain a sleek and compact design, making them highly portable and convenient for on-the-go use;
- Multilingual Flexibility: Virtual keyboards excel at accommodating diverse languages and scripts. They can instantly switch between layouts, enabling users to type in various languages without the need for physical key overlays or language-specific keyboards. This feature is invaluable for global communication and collaboration;
- Accessibility and Inclusion: Virtual keyboards have played a pivotal role in making technology more inclusive. Individuals with mobility challenges, such as those with motor impairments or disabilities, can use virtual keyboards with touch or specialized input devices, empowering them to communicate and navigate digital spaces effectively;
- Customization and Adaptability: Many virtual keyboards allow users to customize layouts, key sizes, and placements according to their preferences. This adaptability ensures a comfortable and personalized typing experience, potentially boosting typing speed and accuracy;
- Enhanced Security: Virtual keyboards can provide an added layer of security, particularly when entering sensitive information like passwords or PINs. Since the input is provided via touch or mouse clicks, the risk of hardware-based keyloggers capturing keystrokes is mitigated, making it a secure option for public or shared environments;
- Software Integration: Virtual keyboards can seamlessly integrate with software and applications, enhancing user experience. They often feature predictive text, autocorrect, and gesture typing, making text input faster and more efficient. Additionally, they can be incorporated into interactive kiosks, digital signage, and touch-enabled presentations;
- Remote and Virtual Environments: In scenarios where physical interaction is limited or not feasible, such as remote desktop sessions or virtual machines, virtual keyboards offer a practical means of input. Users can operate these environments effectively without the need for a physical keyboard;
- Reduced Maintenance: Physical keyboards can accumulate dust, debris, and wear over time, requiring cleaning and eventual replacement. Virtual keyboards eliminate this concern, as they have no physical components that degrade with use;
- Cost-Efficiency: For devices with touchscreen capabilities, virtual keyboards eliminate the need for manufacturing, purchasing, or replacing physical keyboards. This can result in cost savings, especially for devices designed for rugged or specialized environments;
- Innovative User Experience: As technology evolves, virtual keyboards continue to incorporate new features and improvements. They may incorporate gestures, voice input, and other novel interaction methods, contributing to a futuristic and engaging user experience [2];
Setting Up an On-Screen Keyboard on the Raspberry Pi:
1) Required Equipment
- Raspberry Pi: Any model of the Raspberry Pi should work, but it’s recommended to use a Raspberry Pi 3 or newer for better performance;
- MicroSD Card: Ensure you have a microSD card with Raspberry Pi OS (formerly known as Raspbian) installed;
- Monitor, Keyboard, and Mouse: You’ll need these peripherals for the initial setup;
- Internet Connection: A reliable internet connection is necessary to download software packages;
- SSH Client (PuTTY or similar): This is useful if you want to set up the virtual keyboard remotely via SSH;
2) Install Raspberry Pi OS
Before you begin, ensure that you have Raspberry Pi OS installed on your microSD card. If not, follow the official Raspberry Pi OS installation guide to set up the operating system.
Do the System Updates
To ensure your system is up-to-date, open a terminal and execute the following commands:
sudo apt update
sudo apt upgrade -y
Enable SSH
If you plan to set up the virtual keyboard remotely, enable SSH by entering the following command:
sudo raspi-config
Navigate to “Interfacing Options” and enable SSH.
3) Install The Virtual Keyboard Package
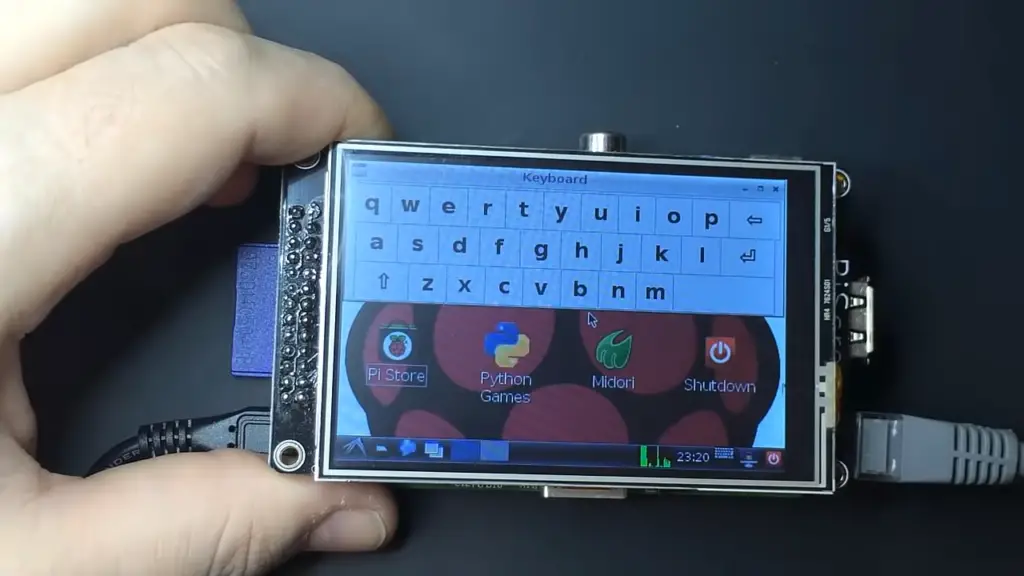
For example, you may pick the on-screen keyboard “Matchbox Keyboard”, a lightweight and customizable virtual keyboard.
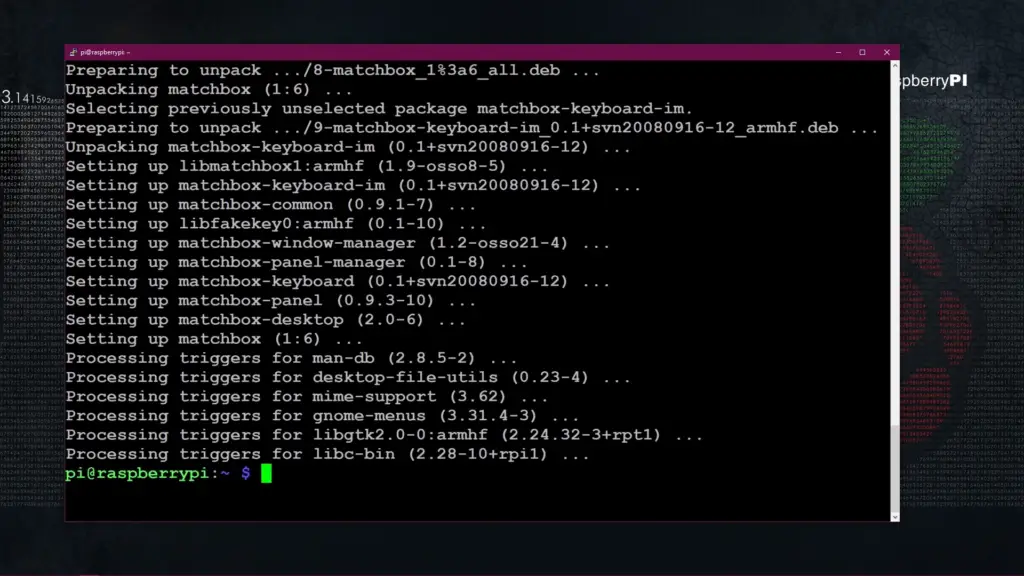
Install the Matchbox Keyboard package by running:
sudo apt install matchbox-keyboard
Installation On Raspberry Pi OS Desktop
If you’re using the Raspberry Pi OS desktop environment, you can access the Matchbox Keyboard from the Accessories menu. Simply click on the “Accessories” menu, then select “Keyboard” to launch the virtual keyboard.
Installation via SSH
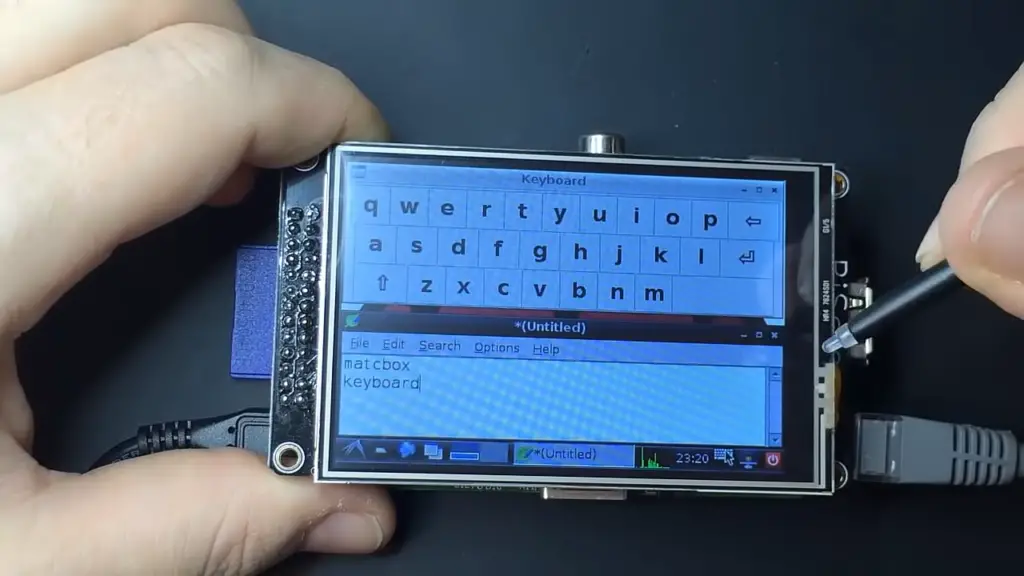
If you’re setting up the virtual keyboard remotely via SSH, you can start the virtual keyboard using the following command:
matchbox-keyboard
4) Opening the Virtual Keyboard on the Raspberry Pi
Using the Desktop to Open the On-Screen Keyboard
If you’re using the Raspberry Pi OS desktop environment, you can easily access the virtual keyboard:
- Click on the “Menu” button (Raspberry Pi logo) in the top-left corner of the screen;
- Navigate to “Accessories”;
- Click on “Keyboard” to launch the Matchbox Keyboard;
Using the Terminal to Launch the Virtual Keyboard
If you’re working via SSH or prefer using the terminal, you can start the virtual keyboard by typing:
matchbox-keyboard
The on-screen keyboard will appear, allowing you to type using your mouse or touch input.
5) Adding a Virtual Keyboard Toggle to the Auto-Start Taskbar
To make the virtual keyboard more accessible, you can add a toggle icon to the auto-start taskbar. This will allow you to quickly open and close the keyboard as needed:
- Right-click on the taskbar at the bottom of the screen;
- Select “Add/Remove Panel Items”;
- In the “Panel Applets” tab, click on the “Add” button;
- Scroll down and find “Keyboard”;
- Click “Add” and then “Close”;
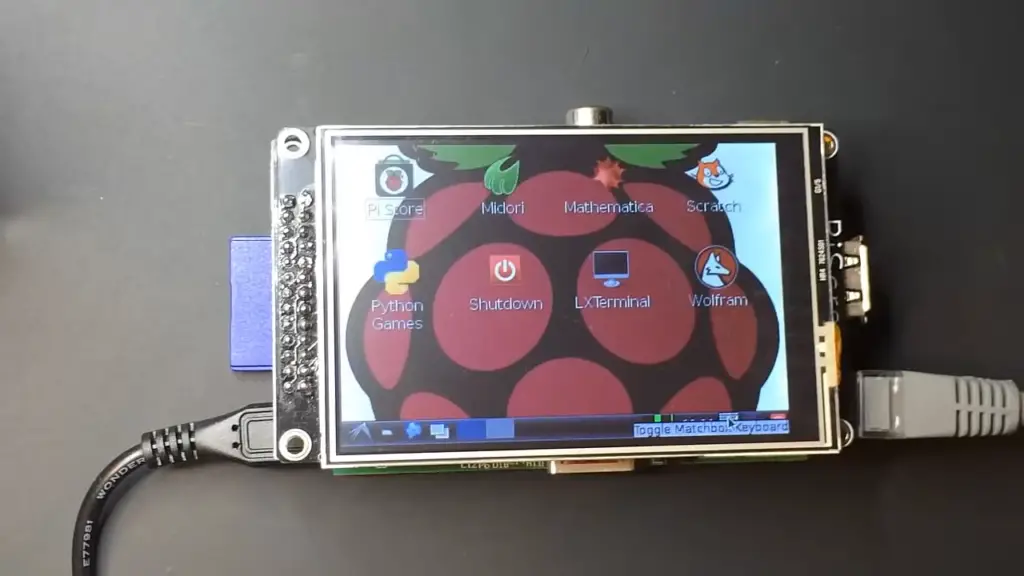
You’ll now see a keyboard icon on the taskbar. Clicking this icon will toggle the virtual keyboard on and off [3].
3 Virtual Keyboards for Raspberry PLC & Panel PC:
Onboard Virtual Keyboard
The Onboard virtual keyboard is a robust and feature-rich option for Raspberry PLC and Panel PC devices. It offers a wide range of customization options, making it suitable for various applications. Onboard supports multiple languages, including non-Latin scripts, ensuring global accessibility. Its intuitive user interface makes it easy to use, even for individuals with limited technical expertise.
Key Features of Onboard:
- Customizable layout and appearance;
- Gesture support for enhanced usability;
- Multilingual support with predictive typing;
- Accessibility features such as high contrast mode and screen magnifier;
- Seamless integration with Raspberry PLC and Panel PC devices;
Advantages of Onboard:
- Versatile customization options cater to diverse user requirements;
- Wide language support ensures global accessibility;
- Gesture support enhances user experience and efficiency;
- Accessibility features make it inclusive for users with disabilities;
Limitations of Onboard:
- May require additional configuration for specific applications;
- Not as lightweight as some other virtual keyboards;
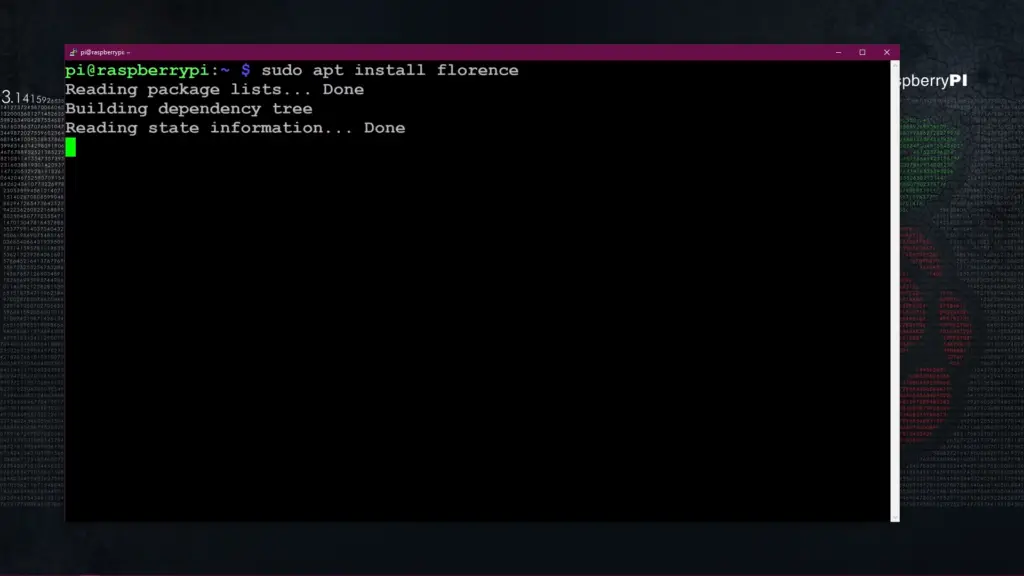
Florence Virtual Keyboard:
Florence is a lightweight virtual keyboard designed specifically for touchscreens, making it an excellent choice for Raspberry PLC and Panel PC devices. Its minimalist design ensures efficient use of screen space, making it ideal for applications with limited display real estate. Florence offers a simple yet intuitive user interface, making it accessible to users of all technical levels.
Key Features of Florence:
- Lightweight and optimized for touchscreens;
- Minimalist design for efficient use of screen space;
- Supports multiple languages with international keyboard layouts;
- Gesture support for enhanced usability;
- Customizable appearance and layout;
Advantages of Florence:
- Lightweight design ensures optimal performance on Raspberry PLC and Panel PC devices;
- Minimalistic interface maximizes screen space utilization;
- Multilingual support caters to a diverse user base;
- Gesture support enhances user experience and navigation;
Limitations of Florence:
- Limited customization options compared to other virtual keyboards;
- May not be suitable for applications that require advanced features or extensive customization;
Matchbox Virtual Keyboard:
Matchbox is a virtual keyboard designed specifically for embedded systems like Raspberry PLC and Panel PC devices. It is highly customizable and allows developers to tailor the keyboard to their specific application requirements. Matchbox offers extensive configuration options, making it a popular choice for projects that demand deep integration and customization.
Key Features of Matchbox:
- Highly customizable and configurable;
- Support for multiple keyboard layouts and languages;
- Gesture support for enhanced user experience;
- Compact design optimized for embedded systems;
- Seamless integration with Raspberry PLC and Panel PC devices;
Advantages of Matchbox:
- Extensive customization options cater to specific application requirements;
- Multilingual support ensures global accessibility;
- Gesture support enhances user experience and efficiency;
- Compact design optimized for embedded systems;
Limitations of Matchbox:
- Requires technical expertise for configuration and customization;
- Limited out-of-the-box features compared to other virtual keyboards [4];
Troubleshooting Common Problems with Virtual Keyboards on Raspberry Pi
While setting up and using a virtual keyboard on a Raspberry Pi can greatly enhance usability and accessibility, occasional issues may arise that require troubleshooting.
1. Virtual Keyboard Not Appearing
- Ensure that you have installed the virtual keyboard software, such as the Matchbox Keyboard package, using the appropriate installation instructions;
- Check that the virtual keyboard is enabled in the system settings. On the Raspberry Pi OS desktop, you can find it under “Menu” > “Accessories” > “Keyboard”;
2. Unresponsive or Laggy Virtual Keyboard
High CPU usage or limited system resources may cause a laggy response. Close unnecessary applications to free up resources.
If using a remote connection via SSH, network latency might be a factor. Ensure a stable network connection.
3. Incorrect Keyboard Layout or Language
Verify that you have set the correct keyboard layout in the Raspberry Pi OS settings. Use the sudo raspi-config command to adjust the layout if needed.
4. Missing Characters or Delayed Input
Slow or missing characters might be due to system performance issues. Optimize your Raspberry Pi’s performance by closing unnecessary background processes.
5. Virtual Keyboard Not Launching via Terminal:
Double-check the command you are using to launch the virtual keyboard. The correct command is matchbox-keyboard.
If the command is not recognized, ensure that you have installed the Matchbox Keyboard package using sudo apt install matchbox-keyboard.
6. Virtual Keyboard Not Working in a Virtual Machine
If you’re running a Raspberry Pi virtual machine, ensure that the virtualization software is configured to pass keyboard input to the VM. Check the settings of your virtualization software, such as VirtualBox.
7. Incorrect Keyboard Size or Placement
If the virtual keyboard’s size or placement seems off, you can customize its settings. Refer to the documentation for the specific virtual keyboard software you are using to learn how to adjust its appearance.
8. Touchscreen Calibration Issues
If using a touchscreen, ensure that it is properly calibrated. Use the built-in calibration tools provided by your touchscreen manufacturer or software.
9. Software Compatibility
Some applications may not respond well to virtual keyboard inputs. Ensure that the software you are using is compatible with virtual keyboards.
10. Permissions and User Access
Ensure that the user account you are using has the necessary permissions to access and interact with the virtual keyboard software.
FAQ:
1. How to install a virtual keyboard in Raspberry Pi 4?
To install a virtual keyboard on a Raspberry Pi 4, you can use the Matchbox Keyboard package. Open a terminal and execute the following commands:
Update your package list:
sudo apt update
Install the Matchbox Keyboard package:
sudo apt install matchbox-keyboard
2. How to set the keyboard layout in the Raspberry command line?
To set the keyboard layout in the Raspberry Pi command line, follow these steps:
Open a terminal.
Use the sudo raspi-config command to access the Raspberry Pi Software Configuration Tool.
Navigate to “Localisation Options” and then “Change Keyboard Layout”.
Follow the on-screen prompts to select your keyboard model and layout.
3. Can a Raspberry Pi act as a keyboard?
Yes, a Raspberry Pi can be configured to act as a USB keyboard. This can be useful for projects that require emulating keyboard inputs. Tools like “Gadget Mode” allow you to configure a Raspberry Pi Zero or later models to act as a USB keyboard or other USB devices.
4. How to set up Raspberry Pi without a keyboard or mouse?
You can set up a Raspberry Pi without a keyboard or mouse using the following steps:
- Flash the Raspberry Pi OS image onto a microSD card using another computer;
- Create an empty file named ssh (without any extension) in the root directory of the microSD card. This enables SSH on the Pi;
- If you want to connect via Wi-Fi, create a file named wpa_supplicant.conf in the root directory and add the necessary Wi-Fi configuration;
- Insert the microSD card into the Raspberry Pi and power it on;
- Access the Raspberry Pi over SSH from another computer on the same network using its IP address [6];
5. Can you use any keyboard with Raspberry Pi?
Yes, you can use virtually any USB or Bluetooth keyboard with a Raspberry Pi. Most keyboards are compatible, and the Raspberry Pi will automatically recognize the keyboard once connected.
6. How to enable the keyboard on a virtual machine?
To enable the keyboard on a virtual machine (VM), you generally need to ensure that the VM software’s settings are properly configured to pass keyboard input to the virtual machine. For instance, if you’re using VirtualBox, you can enable the keyboard by clicking on the VM window and making sure the focus is inside the VM.
7. What keyboard does Raspberry Pi use?
The Raspberry Pi does not come with a physical keyboard. However, you can connect any USB or Bluetooth keyboard to a Raspberry Pi for text input.
8. Why use a virtual keyboard?
A virtual keyboard offers benefits such as portability, adaptability to various languages, accessibility for people with disabilities, and enhanced security when entering sensitive information in public spaces. It’s especially useful when a physical keyboard is not practical or available.
9. Is there any difference between a virtual keyboard and an on-screen keyboard?
The terms “virtual keyboard” and “on-screen keyboard” are often used interchangeably. Both refer to software-based keyboards that are displayed on a screen or touch interface. They serve the same purpose of providing an input method without physical keys. The choice of terminology can depend on context or preference.
10. Can you touch a Raspberry Pi?
You can physically touch a Raspberry Pi, but it’s important to handle it with care. Avoid touching the components or pins directly to prevent damage. When interacting with a Raspberry Pi, it’s recommended to hold it by the edges or use an appropriate case or enclosure to protect it from static discharge and physical contact.
11. Can I use any USB or Bluetooth keyboard with Raspberry Pi?
Yes, you can connect virtually any USB or Bluetooth keyboard to a Raspberry Pi. The Raspberry Pi will automatically recognize the keyboard once connected.
12. How do I set the keyboard layout on Raspberry Pi via the command line?
To set the keyboard layout on Raspberry Pi via the command line, use the following steps:
- Open a terminal;
- Run sudo raspi-config to access the Raspberry Pi Software Configuration Tool;
- Navigate to “Localisation Options” and then “Change Keyboard Layout”;
- Follow the on-screen prompts to select your keyboard model and layout;
13. Can Raspberry Pi act as a virtual keyboard itself?
Yes, you can configure a Raspberry Pi to act as a USB keyboard using “Gadget Mode” or other methods. This allows you to emulate keyboard inputs for various purposes.
14. How do I open the virtual keyboard on Raspberry Pi?
You can open the virtual keyboard on Raspberry Pi in multiple ways:
If you are using Raspberry Pi OS desktop, go to “Menu” > “Accessories” > “Keyboard”.
Via the terminal, simply run matchbox-keyboard.
15. How do I set up Raspberry Pi without a physical keyboard or mouse?
You can set up Raspberry Pi without a physical keyboard or mouse by flashing the OS image, creating an empty ssh file on the boot partition, and configuring Wi-Fi using a wpa_supplicant.conf file. You can then access it remotely via SSH.
16. Why use a virtual keyboard on Raspberry Pi?
Using a virtual keyboard on Raspberry Pi offers advantages like portability, adaptability to different languages, accessibility for people with disabilities, and enhanced security in public spaces.
17. Can I add a virtual keyboard toggle to the auto-start taskbar?
Yes, you can add a virtual keyboard toggle to the auto-start taskbar by right-clicking the taskbar, selecting “Add / Remove Panel Items” and adding the “Keyboard” applet.
18. Are virtual keyboards compatible with all Raspberry Pi models?
Yes, virtual keyboards are compatible with all Raspberry Pi models, including the Raspberry Pi 4, Raspberry Pi 3, and earlier versions.
19. How do I handle a virtual keyboard in a Raspberry Pi virtual machine?
To use a virtual keyboard in a Raspberry Pi virtual machine, ensure that the virtualization software is set to pass keyboard input to the virtual machine. For example, in VirtualBox, click on the VM window to focus inside the VM.
Useful Video: 3 Solutions to Enable On-screen Keyboard on Raspberry Pi OS
References
- https://pimylifeup.com/raspberry-pi-on-screen-keyboard/
- https://linuxhint.com/setting-up-on-screen-keyboard-raspberry-pi/
- https://raspberrytips.com/install-virtual-keyboard-raspberry-pi/
- https://www.industrialshields.com/blog/raspberry-pi-for-industry-26/top-3-on-screen-virtual-keyboards-for-raspberry-plc-panel-pc-401
- https://docs.sunfounder.com/projects/ts10-pro/en/latest/quick_guide/install_virtual.html
- https://www.delftstack.com/howto/raspberry-pi/raspberry-pi-on-screen-keyboard/